
Domains
What is DNS Propagation
Whenever you make changes to your domain’s name servers, they need to reflect across the internet. This process, which usually takes anywhere between 24-48 hours to complete, is called DNS Propagation.
Why do you have to wait for this long?
All Internet Service Providers (ISPs) across the globe store a copy of your domains DNS whenever your website is resolved through their network. They do this, so that your website loads faster when someone visits it the next time. However, when you change your domains DNS or name servers, this copy or cache is not cleared immediately and has to wait for the ISPís to clear their cache and store a fresh copy of your domains updated DNS information.
Can I speed this up?
There is nothing you can do to accelerate the propagation. However, you can plan for propagation to minimize the downtime affects.
Tip for Minimizing Downtime – Once you have uploaded your web content on the new server, you can add DNS records in your existing DNS zone (most likely on your old server) to redirect all visitors to the new server. This is much faster than waiting for the propagation of new name servers. Once you have the DNS records updated to point to the new server, you can change the name servers anytime.
How do I know when propagation is complete?
Unfortunately there are no tools available to track name server propagation. Even a Who is check, ping, and trace route test cannot indicate whether the propagation is complete. Certain tools similar to Whats My DNS give you some information regarding name server propagation. However, it may not show you accurate and complete information.
When we make any DNS changes, we sit back and relax. The changes gets reflected in a day or two (maximum of 48 hours). Weld suggest you to do the same.
DNS
How to Add MX records through Plesk?
Adding MX records on Plesk panel is super simple and won’t take more than 2 minutes. But before getting there, make sure that your domain is pointing to your hosting package name servers. If you still haven’t done this,click here to get it done. Once you’ve got that out of the way, you can proceed to modify MX records on Plesk:
Login to your Plesk Panel.
Expand the advanced Section.
Click on DNS Settings.
Under Tools. click on Add record.
Select the record type as MX
Keep Mail domain/Host blank.
Enter the MX server / Value for the MX record.
Select the priority.
Click OK.
Incase you get a notification ‘Changes made to DNS are not saved yet’, click on ‘Update’.
How to Delete MX records through Plesk?
Deleting MX records on Plesk panel is super easy and won’t take more than 2 minutes. But before getting there, make sure that your domain is pointing to your hosting name servers. If you still haven’t done this, click here to get it done. Once you’ve got that out of the way, you can proceed to modify MX records on Plesk:
1.Login to your Plesk Panel.
2.Expand the advanced Section.
3.Click on DNS Settings.
4.Tick the box next to the record name for the record type MX.
5.Click on removal.
6.Tick the box to confirm removal of MX record and click OK.
7.In case you get a notification ‘Changes made to DNS are not saved yet’, click on ‘Update.
That’s it. Once you make any changes in the DNS, give it about a couple of hours for DNS propagation to complete so that changes reflect globally.
How to Add MX records on cPanel?
Adding MX records on cPanel is super simple and won’t take more than 2 minutes. But before getting there, make sure that your domain is pointing to your hosting package name servers. If you still haven’t done this, click here to get it done. Once youíve got that out of the way, you can proceed to modify MX records on cPanel. Here’s how you do it:
Login to your cPanel.
Scroll to Mail section.
Click on MX Entry.
Select your domain name from the drop down list.
Do not make any changes in the Email Routing section.
Under the MX Records section, you can view the current MX records.
Under Add New Record section, enter the Priority for the MX record.
Enter the Destination/Value for the MX record.
Click on add New Record.
That’s it. Once you make any changes in the DNS, give it about a couple of hours for DNS propagation to complete so that changes reflect globally.
Deleting TXT record on DNS management
Deleting a TXT record is super easy and wont 2 minutes. Here’s how you do it:
1.Login to your account.
2.You will now see a page with all purchases made by you on our system.
3.Click on the domain name for which you want to edit TXT records.
4.Click on the DNS management option to right of the page.
5.Click on “Manage DNS”.
6.Click on TXT record tab.
7.Click on record name from the table.
7.Click on delete record.
8.Click OK.
That’s it. Once you make any changes in the DNS, give it about a couple of hours for DNS propagation to complete so that changes reflect globally.
Deleting Cname record on DNS management
Deleting a Cname record is super easy and wont more than 2 minutes. Here’s how you do it:
1.Login to your account.
2.You will now see a page with all purchases made by you on our system.
3.Click on the domain name for which you want to edit Cname records.
4.Click on the DNS management option to right of the page.
5.Click on “Manage DNS”.
6.Click on Cname record tab.
7.Click on record name from the table.
8.Click on delete record.
9.Click OK.
That’s it. Once you make any changes in the DNS, give it about a couple of hours for DNS propagation to complete so that changes reflect globally.
Adding a TXT record on DNS Management
Adding a TXT record is super easy and wont take much of your time. Here’s how you do it:
1.Login to your account.
2.You will now see a page with all purchases made by you on our system.
3.Click on the domain name for which you want to edit Cname records.
4.Click on the DNS management option to right of the page.
5.Click on “Manage DNS”.
6.Click on TXT record tab.
7.Click on Add TXT record.
8.Keep Host Name blank.
9.Enter the Value
10.Do NOT edit the TTL value and Add Record
That’s it. Once you make any changes in the DNS, give it about a couple of hours for DNS propagation to complete so that changes reflect globally
Adding a MX record on DNS management
Adding a MX record is super easy and wont take much of your time. Here’s how you do it:
1.Login to your account.
2.You will now see a page with all purchases made by you on our system.
3.Click on the domain name for which you want to edit Cname records.
4.Click on the DNS management option to right of the page.
5.Click on “Manage DNS”.
6.Click on MX record tab.
7.Click on Add MX record.
8.Keep Host Name blank.
9.For Value, select the second radio button and enter the value.
10.Do NOT edit the TTL value.
11.Enter the MX priority and click on Add Record.
That’s it. Once you make any changes in the DNS, give it about a couple of hours for DNS propagation to complete so that changes reflect globally.
Deleting MX record on DNS management
Deleting a MX record is super easy and wonít take much of your time. Here’s how you do it:
1.Login to your account.
2.You will now see a page with all purchases made by you on our system.
3.Click on the domain name for which you want to edit Cname records.
4.Click on the DNS management option to right of the page.
5.Click on “Manage DNS”.
6.Click on MX record tab.
7.Click on record name from the table.
8.Click on delete record.
9.Click OK.
Thatís it. Once you make any changes in the DNS, give it about a couple of hours for DNS propagation to complete so that changes reflect globally.
Adding a Cname record on DNS management
Adding a Cname record is super easy and wonít take much of your time. Hereís how you do it:
1.Login to your account.
2.You will now see a page with all purchases made by you on our system.
3.Click on the domain name for which you want to edit Cname records.
4.Click on the DNS management option to right of the page.
5.Click on “Manage DNS”.
6.Add_cname_DNS-1
7.Click on Cname record tab.
8.Click on Add came record.
9.Enter the Host Name.
10.For Value, select thesecond radio button and enter the value.
11.Do NOT edit the TTL value and click on Add Record.
Thatís it. Once you make any changes in the DNS, give it about a couple of hours for DNS propagation to complete so that changes reflect globally.
Setup default LiveMNC name servers
If you want to use our Email or DNS service, you need to point your domain to LiveMNCís default name servers. Trust us its very easy, so letís do it:
1.Login to your account
2.You will now see a page that lists all purchases made by you on our system
3.Click on the domain name for which you need to set the default name servers
4.Click on the DNS Management option to the right of this page
5.Youíll see a warning message – Your DNS Management service is not configured correctly. Configure Now
6.Click on “Configure Now”
7.Click on “Fix Name Servers Automatically”
Thatís it. All you need to do is just wait for these changes to reflect. It may take about a day or two for this, due to DNS Propagation
Changing your Domain Name Servers
For your website to load, you will need to point it to the correct name servers.
Now, you can either use our name servers or use those of your hosting providers (if you have them). This article will help you in changing the name server to your hosting providers name servers. Lets get started:
1.Login to your account
2.You will now see a page with all purchases made by you on our system
3.Click on the domain name for which you need to change the name servers
4.In the Domain Registration section, click on the option “Name Servers”
5.Replace the existing name servers with the ones provided by your current web host and click on Update Name Servers button
Thatís it. You have just updated your name servers to point to your hosting package. Sit back and relax since It could take anywhere between 24-48 hrs for your website to be functional. This delay happens due to Name Server Propogation.
——————————————————————————————————————————————————————————————————-
Step by Step Walkthrough (POP)
You will need your incoming mail server, outgoing mail server, full email address, and your email password. You can find these settings by logging into your Mail Central.
1.Open Outlook 2003.
2.Click Tools.
3.Click Email Accounts.
4.Select Add a new email.
5.Click Next.
6.Select Account Type: POP3 (same as POP).
7.Click Next.
8.Fill in the following information:
Your Name: The name to display on your email.
Email Address: Your full email address
User Name: Your full email address
Password: Your email password
Incoming mail server (POP3): pop.livemnc.com
Outgoing mail server (SMTP): smtp.livemnc.com
Remember password: We recommend that you keep this checked.
Log on using Secure Password Authentication (SPA): We recommend that you keep this unchecked.
9.Click More Settings.
10.Click Outgoing Server.
11.Check My outgoing server (SMTP) requires authentication.
12.Select Use same settings as my incoming mail server.
13.Click Advanced.
14.Fill in the following information:
Incoming Server (POP3): 110
Outgoing Server (SMTP): 587
15.Click OK.
16.Click Next.
17.Click Finish to complete the set-up.
Step by Step Walkthrough (IMAP)
You will need your incoming mail server, outgoing mail server, full email address, and your email password. You can find these settings by logging into your Mail Central.
1.Open Outlook 2003.
2.Click Tools.
3.Click Email Accounts.
4.Select Add a new email.
5.Click Next.
6.Select Account Type: IMAP
7.Click Next.
8.Fill in the following information:
Your Name: The name to display on your email.
Email Address: Your full email address
User Name: Your full email address
Password: Your email password
Incoming mail server (IMAP): imap.livemnc.com
Outgoing mail server (SMTP): smtp.livemnc.com
Remember password: We recommend that you keep this checked.
Log on using Secure Password Authentication (SPA): We recommend that you keep this unchecked.
9.Click More Settings.
10.Click Outgoing Server.
11.Check My outgoing server (SMTP) requires authentication.
12.Select Use same settings as my incoming mail server.
13.Click Advanced.
14.Fill in the following information
Incoming Server (IMAP): 143
Outgoing Server (SMTP): 587
15. Click OK.
16.Click Next.
17.Click Finish to complete the set-up.
Resetting your WordPress Admin Password from cPanel
Changing your WordPress Admin Password from your WordPress Dashboard is easy, but if you donít have access to the Admin email address and have forgotten the password, then it could be frustrating. But donít worry, weíll help you get access to your account asap.
Before we proceed you’ll need you to access your database. If you have multiple databases and not aware which one you should be accessing, follow these steps quickly:
1.Login to your cPanel.
2.Scroll down to softaculous Apps installer section.
3.Click on WordPress.
4.Under current installations, you will see the details of your wordpress installation.
5.Click on Edit details under options.
6.You will be able to view the database name.
7.Click on Goto Control panel.
8.Scroll down to Databases section.
9.Click on “phpMyAdmin”
10.Youíll now see the phpMyAdmin interface which is the tool to manage your database online
11.Click the “+” sign next to your FTP username.
12.You wíll now see all the databases listed below.
13.Click on your database name to view all the tables within your database.
14.Click on table wp_users.
15.Click on Edit.
16.Under the column, User_pass, select the function as MD5 and enter the Password of your choice under Value.
17.Click Go.
Getting started – Linux Shared hosting
Congratulations on your new hosting package. Weíd guess that youíre eager to start and weíre here to help you do just that:
Updating nameservers
It’s important to link your domain to a hosting server. Click here to update the namesevers of your domain. Please note if your domain is registered with a different domain registrar, then you will need contact your vendor for updating nameservers.
Or Mapping your domain name to your Hosting Package
Now that youíve got your domain and hosting from us, you will need to map your domain name to your hosting package. So letís get started:
1.Login to your account
2.You will now see a page with all purchases made by you on our system
3.Click on the where your hosting plan name is mentioned next to it
4.Click on ìName Server Detailsî under the Hosting package that youíve purchased
5.This will open a pop-up window. Copy the 2 name servers that you see on a notepad
6.Now scroll up to the Domain Registration section. Over here click on ìName Serversî
7.Replace the existing name servers and with the ones you noted earlier and click on Update Name Servers button
Thatís it. Youíve just mapped your domain name to point to your brand new hosting package. It could take anywhere between 24-72 hrs for your website to be functional due to DNS Propagation
Accessing cPanel
Get access to your cPanel interface from the following to load the login page
http://yourdomainname/cpanel (http://IPaddress/cpanel)
http://yourdomainname:2082 (http://IPaddress:2082)
Creating email accounts
Creating Emails on Windows Hosting
Creating your email addresses on Windows Hosting is very simple. It should not take you more than 5 minutes to set it up. Letís get started:
1.Login to your Parallels Plesk Panel
2.Click on the “Mail” tab on the top
3.Click on the button “Create E-mail Address”
4.Fill in the desired Email and Password
5.Set a Mailbox Quota
6.3Click on OK
Thatís it, youíre done!
To check your email, you may use the webmail interface by opening a new tab on your browser and entering the URL – webmail.your-domain.com (eg – If your domain name is abc.com, enter the URL – webmail.abc.com). Once in, you are all set to use your brand new email address.
Related Articles:
Checking your Email on Webmail – Windows Hosting
There are multiple ways to check your email. The best and the easiest way is using the webmail. We’ll show you how:
1.Once you have created your email account, just open a browser, and go to webmail.yourdomain.com
2.You’ll see the login screen now. Enter your complete Email address
3.Enter your Password
4.Click on Log in
That’s it! You’re there on your inbox and can start using your emails right away.
Email Client Configuration
Please select the Email Client on which you want to configure your Email account:
Outlook Express
Microsoft Outlook 2010
Microsoft Outlook 2007
Windows Live Mail
Mozilla Thunderbird
Apple Mail
Other Desktop Email Client
Please select the Mobile Device on which you want to configure your Email account:
Android
iPhone
iPad
BlackBerry
Windows Phone
Other Mobile Devices
Uploading files to your website
Uploading files to cPanel
Uploading files to cPanel is easy and doesnít take much time. Hereís how you can do it :
1.Login to your cPanel.
2.Scroll to Files section, click on ëFile Managerí.
3.Select Web Root(public_html), click on GO.
4.Click on ëUploadí.
5.Click on ëBrowseí to select the file from your computer.
6.Once the upload is complete, click on ëBack to /home/username/public_htmlí.
Thatís it. You have successfully uploaded files on to cPanel to publish your website.
Note: Primary file should be named as index. Extension will depend on the coding such as index.html, index.php etc.
How to access Hidden files on cPanel
All file names that begin with (dot) such as (.htaccess) are treated as hidden files. To make them accessible, you need to follow 4 easy steps and it wonít even take a minute. Hereís what you need to do:
1.Login to your cPanel.
2.Under Files section, click on File manager.
3.You will see a window pop up for directory selection.
4.Tick the box for ìShow hidden files(dotfiles)î.
Thatís it. Your preference has been saved. Go ahead and select the directory that you would like to view and access the hidden file.
What is FTP? And how to use it
FTP simply stands for ëFile Transfer Protocolí. It is an easy way to transfer/upload files, webpages, images on to your hosting server. The best part about FTP is that you are not restricted to only files, you can also upload folders too. Also, there is no limit on the total number of files or folder size that you upload to the server.
Why is it useful for Me?
On Linux/windows hosting panels such as Plesk or cPanel, you have an upload option, however, they have restrictions such only files can be uploaded or files of size upto 1Gb can be uploaded. This makes it tedious if you have many files and folders to be uploaded on to the server.
FTP clients (applications) help overcome these limitations and make file uploads a walk in the park. Hereís a small list of FTP clients that you can make use of:
FileZilla
Cyberduck
WinSCP
BitKinex
CuteFTP Pro
CrossFTP
Webdrive
ClassicFTP
CoreFTP
Restoring a Backup of your website on cPanel
Restoring your website using cPanel is quite simple. But before we proceed, a few prerequisites that you need to take care of:
If you were using cPanel previously and have downloaded the backup from the Backup option, make sure to extract the backup folder and keep public_html folder separate.
All your website files and folders that need to be published are under the public_html folder.
To upload all files and folder together(recommended), compress(zip or tar) the contents inside public_html.(Please note do not compress the folder public_html, only the contents inside it.)
Make sure that no other file or folder is present inside the public_html folder on your cPanel, this could result in a conflict incase of same file names.
Once youíve got the above covered, you can get to restoring your website:
Login to your cPanel.
Scroll to Files section, click on ëFile Managerí.
Select Web Root(public_html), click on GO.
Click on ëUploadí.
Click on ëBrowseí to select the file from your computer.
Once the upload is complete, click on ëBack to /home/username/public_htmlí.
Click on compressed file icon to select the file and click on ëExtractí.
Do not make any changes to the path and click on ëExtract File(s)í.
Click close.
If the Files have been extracted into a folder, open the folder.
Select all files, click on ëMove Fileí.
Under the destination path, keep the following ë/public_html/í and remove the folder name after it.
Thatís it. Youíve successfully uploaded your website files. You could check your website by resolving your domain name on the browser. Incase you want to restore a database.
Setup a CRON job in cPanel
If youíd like to run a script on your website at specified intervals, you can just setup a CRON job and it will run your script automatically at that time. Hereís how you set it up:
1.Login to your cPanel
2.Scroll down to Advanced section
3.Click on “CRON jobs”
4.Set the time interval for which youíd like to run your CRON job
Note: Cron jobs with frequency of less than 15mins will default to 15mins to prevent crons from using up precious server resources
5.Enter the command to eun your script:
For example, to run a PHP script at an interval, set the command as: php /home/username/public_html/cron.php (where cron.php is your PHP file)
If youíd like to see more such examples, Click Here
6.Click on “Add New Cron Job”
That’s it. Just sit back and relac and the cron job will run automatically to run your script at regular intervals.
Setup redirection for your website URL on Linux Hosting
If youíd like to setup a redirection from one of your website URL to another URL, hereís how you do it
1.Login to cPanel
2.Scroll down to the Domains section
3.Click on “Redirects”
4.Select your domain name or sub-domain name from the drop down list for which you want to setup a redirect
5.If youíd like a sub-directory to be redirected, enter the sub-directory name in the text box beside your domain name (For eg – If you like to redirect yourdomain.com/page1 to example.com enter page1 in this text box)
6.Enter the destination URL to which you want to redirect to
7.Set the www redirection type (Only redirect with www | Redirect with or without www | Do Not Redirect www | Wild Card Redirect)
8.Click on Add
Thatís it. Within a few minutes, youíll start seeing your website URL redirected to the other URL you just entered.
Creating an FTP account on Windows Hosting
If youíre planning to have your website developed by a web developer, you wíll need to give him access to your hosting package. This can be done either by giving him the admin FTP details we shared with you when you purchased the package or by creating an additional FTP account for him. Here ís how you create it:
1.Login to your Plesk Panel
2.Click on “FTP Access”
3.Click on “Create Additional FTP Account”
4.Enter a FTP account name
5.Set the Home Directory to the default value “/”
6.Enter a New FTP Password & confirm it
7.Tick on Read permission & Write permission
8.Click on “OK”
Thatís it. You now have an FTP account created specially for your web developer so that he can access it using an FTP client. Just give him your hosting package IP address and FTP username and password you just created for him and heís all good to go.
Creating an FTP account on Linux Hosting
If youíre planning to have your website developed by a web developer, youíll need to give him access to your hosting package. This can be done either by giving him the admin FTP details we shared with you when you purchased the hosting package or by creating an additional FTP account for him. Hereís how you create it:
1.Login to your cPanel
2.In the Files section, Click on “FTP Accounts”
3.Enter a Login username
4.Enter a password and confirm it
5.The Directory field will get auto-populated with the following value:
public_html/
REMOVE your and set it to just “public_html”
Note – If you wish to grant access to your developer only to a particular sub-directory or an Addon Domain (in case of Multi Domain Hosting), youíll need to set the path of that Directory here
6.Click on “Create FTP account”
Thatís it. You now have an FTP account created specially for your web developer so that he can access it using an FTP client. Just give him your hosting package IP address and FTP username and password you just created for him and heís all good to go.
Creating a sub-domain on Windows Hosting – Plesk
Creating a sub-domain on your Windows Hosting is super easy with your Plesk Panel. Hereís how you do it:
1.Login to your Plesk Panel
2.Click on “Add New Subdomain”
3.Enter a sub-domain name that you are looking to create. For example: support.yourdomain.com
4.The Document Root field will auto-populate with the default path where your website will be hosted for this particular sub-domain. You can change this if youíd like to customize the path for your sub-domain website
5.Click on “OK”
Thatís it. You can now upload content to your sub-domain using FTP or Plesk in the path mentioned that was specified in Document Root
Creating a sub-domain on Linux Hosting
Creating a sub-domain on your Linux Hosting is super easy with your cPanel. Hereís how you do it:
1.Login to your cPanel
2.Scroll down to the Domains section
3.Click on “Subdomains”
4.Enter a sub-domain name that you are looking to create. For example: support.yourdomain.com
5.The Document Root field will auto-populate with the default path where your website will be hosted for this particular sub-domain. You can change this if youíd like to customize the path for your sub-domain website
6.Click on “Create”
Thatís it. You can now upload content to your sub-domain using FTP or cPanel in the path mentioned that was specified in Document Root
Change your cPanel or FTP Password
Changing your cPanel or admin FTP password will take you less than a couple of minutes. Hereís how you do that:
1.Login to your account
2.You will now see a page that lists all purchases made by you on our system
3.Click on the domain name associated with your hosting package
4.Click on “Admin Details”
5.Click on “Change Password”
6.Set the New Password
7.Click on “Change Password”
Thatís it! Your cPanel or admin FTP password is now changed and all good to use.
Common Error Messages on FileZilla
This article shows you common error messages that you may face on FileZilla while connecting through FTP and how it can be resolved.
-
- Scenario 1
Error Message :
Response: 421 Sorry, cleartext sessions are not accepted on this server.
Error: Could not connect to server
Resolution :
Please check the following details while connecting via FileZilla :
Protocol: FTP protocol
Encryption: Require FTP over explicit TLS/SSL
LogonType : Normal
-
- Scenario 2
Error Message :
Response: 530 Login authentication failed
Error: Critical error
Error: Could not connect to server
Resolution :
Please check the following details while connecting via FileZilla:
Step 1
Host : IP Address
Port : 21
Protocol: FTP protocol
Encryption: FTP over explicit TLS/SSL
LogonType : Normal
UserName : Correct Username
Password : Correct Password
Step 2
If you are using the primary FTP connection details, please reset the FTP password which will in turn will reset the hosting panel password. You may Click Here to change the primary FTP details then try to connect.
If you are using secondary FTP connection details (FTP Accounts created from the hosting panel), please reset the FTP password from the cPanel/Plesk panel and then try to connect.
Step 3
Launch FileZilla, click Edit and select Settings.
Click on FTP on the left pane and in the middle pane make sure Passive is selected. Click OK and that’s it.
-
- Scenario 3
Error Message :
Response: 331 User savsuq2b1 OK. Password required
Error: Filezilla is running in kiosk mode
Error: Could not connect to server
Resolution :
The ìkiosk modeî means that FileZilla canít save your password, because the ëNormalí and ëAccountí logon type need to save password so FileZilla can proceed it.
Step 1
LogonType : Ask for Password
You will have to enter the password every time you connect to via the FileZilla application to the FTP Server.
Step 2
If you are not comfortable with entering the password in the FileZilla interface every time you may try to connect via FileZilla to the FTP Server, you just need to change some settings. Launch FileZilla, Go to menu Edit ñ Settings ñ Interface, and uncheck (disable) ìDo not save passwordsî option under Behavior setting. After that you should be able to add new sites on FileZilla.
-
- Scenario 4
Error Message :
Response: 331 User savsuq2b1 OK. Password required
Error: Connetion timed out
Error: Could not connect to server
Resolution :
Step 1
Host : Hosting IP Address
Port : 21
Protocol: FTP protocol
Encryption: FTP over explicit TLS/SSL
Step 2
Check for Firewalls or Antivirus installed on his personal workstation. Disabling them for a while to test the same may help to some extent.
Step 3
If you are working from an Office network. If yes please contact your office IT department for the same.
Add On Point : If Filezilla times out its connection when you are transferring files, try disabling the Timeout setting. To do this, click on “Edit” then choose settings. It will bring up a window .Change the Timeout to zero as shown, click OK, and you’re ready.
-
- Scenario 5
Error Message :
Response: 530 User cannot log in, home directory inaccessible.
Error: Critical error
Error: Could not connect to server
Resolution :
Step 1
Check if the home directory of the FTP account created exists or not. The problem can easily be fixed by creating the directory set as home for the FTP user. You can see which directory each FTP user has from your cPanel > FTP Accounts. The directory will be shown in the Path section of the page.
Step 2
Check the credentials of the FTP account created in the hosting panel. Try and reset the password if possible and then try to connect once again.
Step 3
You also need to check the permission of the home folder. It must be 710 and not 755 (in case of Linux Hosting).
-
- Scenario 6
Error Message :
Response: 421 Home directory not available – aborting
Error: Could not connect to server
Resolution :
This means that the FTP user you are trying to log in with is configured to use a home directory which does not exist. The problem can easily be fixed by creating the directory set as home for the FTP user. You can see which directory each FTP user has from your cPanel > FTP Accounts. The directory will
be shown in the Path section of the page.
Reseller Hosting
Creating a hosting plan on Windows Reseller Hosting
Just like we have various plans for our customers on our website, you too can create packages for your customers with the Windows Reseller Hosting. In this article weíll help you create such a plan or package under your Reseller Hosting plan, so letís get started:
1.Login to your Reseller Plesk Panel
2.Click on “Service Plans” in the menu you see to your left
3.Click on “Add New Plan”
4.Set a Service plan name of your choice
5.Fill in the Resources (Disk Space, Bandwidth, No. of email IDs, etc) you want to allocate for the package
6.Click on “OK”
Thatís it. Youíve just created a new plan on your Windows Reseller Hosting for your customers.
Now if youíd like to give this plan to one of your customer, click here
Creating a customer on Reseller Windows Hosting
If youíd like to sell a hosting plan created on your Windows Reseller Hosting package, youíd need to create a customer account subscription. If youíve still not created the hosting plan, click here. Read on if youíve already created your plans
1.Login to your Plesk Reseller Panel
2.Click on “Customers” in the menu you see to your left
3.Click on “Add New Customer”
4.Fill in the information of your customer
5.Set a username and password for your customers to access the panel
6.Enter your customerís domain name
7.Set a FTP username and password for the subscription
8.Choose the service plan that youíve created
9.Click on “OK”
Thatís it. You can pass on these credentials to your customer so that he/she can start using it right away.
Changing the package or plan of a website in your Linux Reseller Hosting
If your customerís hosting plan on your Reseller Linux Hosting is falling short of resources or youíd like to set it limited resources, you can upgrade or downgrade their plan.
If youíve still not created an appropriate plan for that customer, you can create one by referring to the article here
Once youíve created the package, you need to change your customerís hosting plan. You can do it easily. Hereís how you do it:
1.Login to your WHM
Search for the Account Functions section on the navigation to your left
2.Click on “List Accounts” in this section
3.Youíll now see your customers account on this page.
4.Click on the “+” sign to the left of your customerís domain
5.Click on “Change Plan”
6.Select the Plan that youíd like to set for that customer
7.Click on “Upgrade/Downgrade”
Thatís it. Your customer hosting will be updated in just a few seconds.
Adding an Account on WHM – Linux
To create an account on WHM, you first need to Add a Package. Once, you have added a Package, you can associate a cPanel account to it. Hereís how you do it:
1.Login to your WHM Account
2.Search for the Account Functions section on the navigation to your left
3.Click on “Create a New Account” in this section
4.Enter your customers Domain name
5.Give a Username and Password for the account
6.Enter your customerís Email address
7.Choose a Package from the drop-down list (You will see the package you created, in this list)
8.You can let the default values in Settings, Reseller Settings, DNS Settings and Mail Routing Settings as is unless you want to customize these
9.Click Create
You may verify the account by clicking on “List Accounts” in the Account Functions section on the navigation to your left. If you wish to login to the cPanel, just click on the cPanel icon beside the domain name.
Thatís it. You have successfully created an account for your customer on your Reseller Hosting.
Creating a Package on WHM – Linux
With Reseller Hosting, you can create multiple sub-packages which you can then re-sell or use to create multiple websites. All these sub-packages can have their own individual cPanel accounts and login credentials. In this article we will create a package under your Reseller Hosting plan, so letís get started:
1.Login to WHM
2.Search for the Packages section on the navigation to your left
3.Click on “Add a Package” in this section
4.Give a Package Name
5.Fill in the Resources (bandwidth, diskspace, no. of email ids etc) you want to allocate for the package
6.Let the default values in Settings be as is
7.Click Add
Thatís it. You have successfully created a package on your Linux Reseller Hosting. You can follow the same set of steps to create more packages if you need them
Now, you will need to create a cPanel account and assign this package to it. Hereís how you can go about it: Creating your cPanel account
VPS Hosting
Changing your VPS or Dedicated Server root password
Changing your VPS root password will be a cup of tea for you after reading this article.
If you donít have a control panel for your VPS, donít worry. Weíll show you how to change it using SSH. Hereís how you do it:
1.Firstly, access your hosting server using SSH. (Click here if you don’t know how to login using SSH)
2.Once logged in, type in the command – passwd & hit Enter
3.Set a new password and confirm it
And Bang! Your root password is changed. Wasnít that super easy?
If youíve got a cPanel, you need not access your server using SSH. You can do it using WHM. Hereís how you do it:
1. Login to WHM
2.In the Server Configuration section, Click on “Change Root Password”
3.Set a new password and confirm it
4.Click on “Change Password
5.Thatís it. Your root password is changed.
Adding an Account on WHM – Linux
To create an account on WHM, you first need to Add a Package. Once, you have added a Package, you can associate a cPanel account to it. Hereís how you do it:
1.Login to your WHM Account
2.Search for the Account Functions section on the navigation to your left
3.Click on “Create a New Account” in this section
4.Enter your customers Domain name
5.Give a Username and Password for the account
6.Enter your customerís Email address
7.Choose a Package from the drop-down list (You will see the package you created, in this list)
8.You can let the default values in Settings, Reseller Settings, DNS Settings and Mail Routing Settings as is unless you want to customize these
9.Click Create
You may verify the account by clicking on “List Accounts” in the Account Functions section on the navigation to your left. If you wish to login to the cPanel, just click on the cPanel icon beside the domain name.
Thatís it. You have successfully created an account for your customer on your Reseller Hosting.
Creating a Package on WHM – Linux
With Reseller Hosting, you can create multiple sub-packages which you can then re-sell or use to create multiple websites. All these sub-packages can have their own individual cPanel accounts and login credentials. In this article we will create a package under your Reseller Hosting plan, so letís get started:
1.Login to WHM
2.Search for the Packages section on the navigation to your left
3.Click on “Add a Package” in this section
4.Give a Package Name
5.Fill in the Resources (bandwidth, diskspace, no. of email ids etc) you want to allocate for the package
6.Let the default values in Settings be as is
7.Click Add
Thatís it. You have successfully created a package on your Linux Reseller Hosting. You can follow the same set of steps to create more packages if you need them.
Now, you will need to create a cPanel account and assign this package to it. Hereís how you can go about it: Creating your cPanel account
Billing
What is your Money-back Policy?
Settling Invoice using Online Payment options
Adding Funds to your Customer Account
‘Unexpected Error Occured’ message while renewing my order. What…
Enabling Auto Renew Feature
Auto Renew feature
Cancelling inactive Order / Invoice
Settling invoice from Debit account balance
Failure of Transaction or Multiple Transactions recorded at your …
Change your invoice details
Checking your account transactions
Offline Payment Options
Checking Current Balance in your LiveMNC account
Requesting a Refund
My LiveMNC Account
How to regain access to your LiveMNC account?
My LiveMNC Account is hacked, what should I do?
Managing Renewal notices and other Email Notification
Setting your SMS Preference
I forgot my LiveMNC username and password. How do I login
Changing your Username or Registered Email Address
Changing your account details (Name, Company Name, Country)
Checking the Customer ID of your LiveMNC Account
Resetting your LiveMNC Account Password
Changing your LiveMNC Account Password
How do I login to my LiveMNC account
Moving your Product from one LiveMNC account to another
Checking your account PIN
Most Popular : –
Account:
How To Change Your LiveMNC Account Password :
LiveMNC allows you to change your password at any time. You can either change your password once you have logged in, or by creating a password reset email.
1.Log in to your LiveMNC Control Panel.
2.Go to Change Password.
3.Type in a New Password.
4.Confirm your New Password.
5.Click Change Password.
Minimum Password Requirements
Weak Fair Strong Very Secure
6 Total Characters 6 Total Characters 6 Total Characters 8 Total Characters
1 Number 1 Number 2 Numbers 2 Numbers
0 Special Characters 1 Special Character 1 Special Character 2 Special Characters
1 Uppercase Letter 1 Uppercase Letter 1 Uppercase Letter 1 Uppercase Letter
1 Lowercase Letter 1 Lowercase Letter 1 Lowercase Letter 1 Lowercase Letter
Additional Requirements:
When changing your account password, the new password must meet the Strong or Very Secure minimum requirements.
45 maximum total characters allowed.
Must be different than your account username.
When changing your account password, the new password cannot match the last three passwords used on the account.
Your browser must allow cookies on LiveMNC’s website (this is already enabled by default).
FTP:
How to Connect to Your Website
FTP (File Transfer Protocol) is the method used to upload or download files from your website. You will need to use FTP if you plan on uploading or downloading multiple files at the same timee. LiveMNC has prepared this guide to help you understand just how easy it is to use FTP.
How do I connect via FTP?
File Manager: File Manager is built into your LiveMNC Control Panel and is helpful for uploading small groups of files. You can also use File Manager to organize and manage your website files.
FTP Client: FTP clients are the preferred method when using FTP to transfer files. An FTP Client is an application that specializes in optimizing your FTP connection. FTP clients need to be downloaded and installed before use.
This guide covers a popular FTP Client FileZilla. LiveMNC recommends FileZilla because it is fast, free, and easy to use.
How to Connect to FTP Using FileZilla
1.Download and install FileZilla onto your personal computer.
2.Get your FTP settings (these steps use our generic settings).
3.Open FileZilla.
4.Fill out the following information:
Host: ftp.LiveMNC
Username: Your LiveMNC hosting account username
Password: Your LiveMNC hosting account password
Port: 21
5.Click Quickconnect.
6.FileZilla will attempt to connect. It will display Directory Listing Successful once you are connected.
How to Upload Files Using FileZilla
1.Connect to FTP.
2.Use the Local Site area of FileZilla to locate the folder containing the files you want to upload.
3.Use the Remote Site area of FileZilla to locate the folder you want to upload your files into.
4.Note that the contents for each folder are displayed just below the Local Site and Remote Site areas.
5.Click and drag your file from the Local Site side onto the Remote Site side (Note that you can also select multiple files at a time).
6.Upload progress is displayed in the bottom area of FileZilla.
7.Upload is complete once your uploaded files are listed on the Remote Site side.
How to Download Files Using FileZilla
1.Connect to FTP.
2.Use the Remote Site area of FileZilla to locate the folder containing the files you want to download.
3.Use the Local Site area of FileZilla to locate the folder you want to download your files into.
4.Note that the contents for each folder are displayed just below the Remote Site and Local Site areas.
5.Click and drag your file from the Remote Site side onto the Local Site side (Note that you can also select multiple files at a time).
6.Download progress is displayed in the bottom area of FileZilla.
7.Download is complete once your downloaded files are listed on the Local Site side.
What Other FTP Clients Could I Use
CuteFTP
FlashFXP
FTP Voyager
LeapFTP
SmartFTP
WS FTP
Prevent FTP Blacklisting
As a security precaution against malicous attackers, LiveMNC FTP servers will blacklist the IP address of users that have an excessive number of consecutive failed login attempts. This blacklist prevents the user from gaining access into LiveMNC FTP servers, even if the user begins using the correct login credentials.
To avoid the risk of being blacklisted, make sure that you keep your FTP client’s login credentials up to date. Additionally, we recommend that you limit the number of reconnection attempts inside of your FTP client.
To limit the number of reconnection attempts inside of FileZilla:
1.Go to Edit.
2.Click on Settings.
3.In the window that appears, we recommend that you enter the following settings:
Maximum number of retries: 3
Delay between failed login attempts: 300
What are your nameservers
How Do I Update My Domain’s Nameservers?
1.Log in to your LiveMNC Control Panel.
2.Go to Domain Central.
3.Select the domain you want to edit.
4.Click Nameservers.
5.Use the interface provided to modify your nameservers:
Select Use default name servers to use LiveMNC’s nameservers. This option causes your domain to work with your LiveMNC hosting account.
Select Use different name servers to use another company’s nameservers. This option causes your domain to work with another company.
Click Add More if you’re using more than 2 nameservers for the “Use different name servers” option.
6.Click Save once you’re done modifying your nameservers (changes may require 24 to 48 hours to take effect).
How do I configure Outlook?
You will need your incoming mail server, outgoing mail server, full email address, and your email password. You can find these settings by logging into your Mail Central.
1.Open Outlook 2003.
2.Click Tools.
3.Click Email Accounts.
4.Select Add a new email.
5.Click Next.
6.Select Account Type: POP3 (same as POP).
7.Click Next.
8.Fill in the following information:
Your Name: The name to display on your email.
Email Address: Your full email address
User Name: Your full email address
Password: Your email password
Incoming mail server (POP3): pop.LiveMNC
Outgoing mail server (SMTP): smtp.LiveMNC
Remember password: We recommend that you keep this checked.
Log on using Secure Password Authentication (SPA): We recommend that you keep this unchecked.
9.Click More Settings.
10.Click Outgoing Server.
11.Check My outgoing server (SMTP) requires authentication.
12.Select Use same settings as my incoming mail server.
13.Click Advanced.
14.Fill in the following information:
Incoming Server (POP3): 110
Outgoing Server (SMTP): 587
15.Click OK.
16.Click Next.
17.Click Finish to complete the set-up.
Step by Step Walkthrough (IMAP)
You will need your incoming mail server, outgoing mail server, full email address, and your email password. You can find these settings by logging into your Mail Central.
1.Open Outlook 2003.
2.Click Tools.
3.Click Email Accounts.
4.Select Add a new email.
5.Click Next.
6.Select Account Type: IMAP
7.Click Next.
8.Fill in the following information:
Your Name: The name to display on your email.
Email Address: Your full email address
User Name: Your full email address
Password: Your email password
Incoming mail server (IMAP): imap.LiveMNC
Outgoing mail server (SMTP): smtp.LiveMNC
Remember password: We recommend that you keep this checked.
Log on using Secure Password Authentication (SPA): We recommend that you keep this unchecked.
9.Click More Settings.
10.Click Outgoing Server.
11.Check My outgoing server (SMTP) requires authentication.
12.Select Use same settings as my incoming mail server.
13.Click Advanced.
14.Fill in the following information
Incoming Server (IMAP): 143
Outgoing Server (SMTP): 587
15. Click OK.
16.Click Next.
17.Click Finish to complete the set-up.
Email Client Setup: Outlook 2003
Step by Step Walkthrough (POP)
You will need your incoming mail server, outgoing mail server, full email address, and your email password. You can find these settings by logging into your Mail Central.
1.Open Outlook 2003.
2.Click Tools.
3.Click Email Accounts.
4.Select Add a new email.
5.Click Next.
6.Select Account Type: POP3 (same as POP).
7.Click Next.
8.Fill in the following information:
Your Name: The name to display on your email.
Email Address: Your full email address
User Name: Your full email address
Password: Your email password
Incoming mail server (POP3): pop.LiveMNC
Outgoing mail server (SMTP): smtp.LiveMNC
Remember password: We recommend that you keep this checked.
Log on using Secure Password Authentication (SPA): We recommend that you keep this unchecked.
9.Click More Settings.
10.Click Outgoing Server.
11.Check My outgoing server (SMTP) requires authentication.
12.Select Use same settings as my incoming mail server.
13.Click Advanced.
14.Fill in the following information:
Incoming Server (POP3): 110
Outgoing Server (SMTP): 587
15.Click OK.
16.Click Next.
17.Click Finish to complete the set-up.
Step by Step Walkthrough (IMAP)
You will need your incoming mail server, outgoing mail server
full email address, and your email password. You can find these settings by logging into your Mail Central.
1.Open Outlook 2003.
2.Click Tools.
3.Click Email Accounts.
4.Select Add a new email.
5.Click Next.
6.Select Account Type: IMAP
7.Click Next.
8.Fill in the following information:
Your Name: The name to display on your email.
Email Address: Your full email address
User Name: Your full email address
Password: Your email password
Incoming mail server (IMAP): imap.LiveMNC
Outgoing mail server (SMTP): smtp.LiveMNC
Remember password: We recommend that you keep this checked.
Log on using Secure Password Authentication (SPA): We recommend that you keep this unchecked.
9.Click More Settings.
10.Click Outgoing Server.
11.Check My outgoing server (SMTP) requires authentication.
12.Select Use same settings as my incoming mail server.
13.Click Advanced.
14.Fill in the following information:
Incoming Server (IMAP): 143
Outgoing Server (SMTP): 587
15.Click OK.
16.Click Next.
17.Click Finish to complete the set-up
Email Client Setup: Outlook 2007
You will need your incoming mail server, outgoing mail server, full email address, and your email password. You can find these settings by logging into your Mail Central.
1.Open Outlook 2007.
2.Click Tools.
3.Click Account Settings.
4.Click New to create a new email account.
5.Check Manually configure server settings or additional server types.
6.Click Next.
7.Select Internet Email.
8.Click Next.
9.Fill in the following information:
Your Name: How you want your name to appear in emails (example: John Smith)
Email Address: Your full mailbox address (example: [email protected])
Account Type: POP3 (same as POP)
Incoming mail server: pop.LiveMNC
Outgoing mail server (SMTP): smtp.LiveMNC
User Name: Your full mailbox address (example: [email protected])
Password: Your mailbox password
Remember password: We recommend that you keep this checked.
Require logon using Secure Password Authentication (SPA): We recommend that you keep this unchecked.
10.Click More Settings.
11.Click Outgoing Server.
12.Check My outgoing server (SMTP) requires authentication.
13.Click Advanced.
14.Fill in the following information:
Incoming Server (POP3): 110
Outgoing Server (SMTP): 587
15.Click OK.
16.Click Next to complete the setup of your email client
Step by Step Walkthrough (IMAP)
You will need your incoming mail server, outgoing mail server, full email address, and your email password. You can find these settings by logging into your Mail Central.
1.Open Outlook 2007.
2.Click Tools.
3.Click Account Settings.
4.Click New to create a new email account.
5.Check Manually configure server settings or additional server types.
6.Click Next.
7.Select Internet Email.
8.Click Next.
9.Fill in the following information:
Your Name: How you want your name to appear in emails (example: John Smith)
Email Address: Your full mailbox address (example: [email protected])
Account Type: IMAP
Incoming mail server: imap.LiveMNC
Outgoing mail server (SMTP): smtp.LiveMNC
User Name: Your full mailbox address (example: [email protected])
Password: Your mailbox password
Remember password: We recommend that you keep this checked.
Require logon using Secure Password Authentication (SPA): We recommend that you keep this unchecked.
10.Click More Settings.
11.Click Outgoing Server.
12.Check My outgoing server (SMTP) requires authentication.
13.Click Advanced.
14.Fill in the following information:
Incoming Server (IMAP): 143
Outgoing Server (SMTP): 587
15.Click OK.
16.Click Next to complete the setup of your email client
Email Client Setup: Outlook 2010
Step by Step Walkthrough (POP)
You will need your incoming mail server, outgoing mail server, full email address, and your email password. You can find these settings by logging into your Mail Central.
1.Open Outlook 2010.
2.Click File.
3.Select Info.
4.Click Add Account.
5.Select Manually configure server settings or additional server types.
6.Click Next.
7.Select Internet Email.
8.Click Next.
9.Fill in the following information:
Your Name: The name to display on your email
Email Address: Your full email address
Account Type: POP3 (same as POP)
Incoming mail server: pop.LiveMNC
Outgoing mail server (SMTP): smtp.LiveMNC
User Name: Your full email address
Password: Your email password
Remember password: We recommend that you keep this checked.
Require logon using Secure Password Authentication (SPA): We recommend that you keep this unchecked.
10.Click More Settings.
11.Click Outgoing Server.
12.Check My outgoing server (SMTP) requires authentication.
13.Select Use same settings as my incoming mail server.
14.Click Advanced.
15.Fill in the following information:
Incoming Server (POP3): 110
Outgoing Server (SMTP): 587
16.Click OK.
17.Click Next to complete the set-up
Step by Step Walkthrough (IMAP)
You will need your incoming mail server, outgoing mail server, full email address, and your email password. You can find these settings by logging into your Mail Central.
1.Open Outlook 2010.
2.Click File.
3.Select Info.
4.Click Add Account.
5.Select Manually configure server settings or additional server types.
6.Click Next.
7.Select Internet Email.
8.Click Next.
9.Fill in the following information:
Your Name: The name to display on your email
Email Address: Your full email address
Account Type: IMAP
Incoming mail server: imap.LiveMNC
Outgoing mail server (SMTP): smtp.LiveMNC
User Name: Your full email address
Password: Your mailbox password
Remember password: We recommend that you keep this checked.
Require logon using Secure Password Authentication (SPA): We recommend that you keep this unchecked.
10.Click More Settings.
11.Click Outgoing Server.
12.Check My outgoing server (SMTP) requires authentication.
13.Select Use same settings as my incoming mail server.
14.Click Advanced.
15.Fill in the following information:
Incoming Server (IMAP): 143
Outgoing Server (SMTP): 587
16.Click OK.
17.Click Next to complete the setup.
Email Client Setup: Outlook 2013
Step by Step Walkthrough (POP)
You will need your incoming mail server, outgoing mail server, full email address, and your email password. You can find these settings by logging into your Mail Central.
1.Open Outlook 2013.
2.Click File.
3.Click Info.
4.Click Add Account.
5.Choose Manual setup or additional server types.
6.Click Next.
7.Choose POP.
8.Click Next.
9.Fill in the following information:
Your Name: The name to display on your email.
Email Address: Your full email address
Account Type: POP
Incoming Mail Server: pop.LiveMNC
Outgoing Mail Server (SMTP): smtp.LiveMNC
User Name: Your full email address
Password: Your emailpassword
Remember Password: We recommend having this checked.
Require logon using Secure Password Authentication (SPA): We recommend having this unchecked.
10.Click More Settings.
11.Click Outgoing Server.
12.Check My outgoing server (SMTP) requires authentication.
13.Select Use the same settings as my incoming mail server.
14.Click Advanced.
15.Fill in the following information:
Incoming Server (POP Port): 110
Use the following type of encrypted connection (Incoming): Optional. If enabled, change Incoming Server (POP Port) to 995.
Outgoing Server (SMTP Port): 587
Use the following type of encrypted connection (Outgoing): Optional. If enabled, change Outgoing Server (SMTP Port) to 465.
16.Click OK.
17.Click Next.
18.Click Finish to complete the set-up.
Step by Step Walkthrough (IMAP)
You will need your incoming mail server, outgoing mail server, full email address, and your email password. You can find these settings by logging into your Mail Central.
1.Open Outlook 2013.
2.Click File.
3.Click Info.
4.Click Add Account.
5.Choose Manual setup or additional server types.
6.Click Next.
7.Choose IMAP.
8.Click Next.
9.Fill in the following information:
Your Name: The name to display on your email.
Email Address: Your full mailbox address
Account Type: IMAP
Incoming Mail Server: imap.LiveMNC
Outgoing Mail Server (SMTP): smtp.LiveMNC
User Name: Your full email address
Password: Your email password
Remember Password: We recommend having this checked.
Require logon using Secure Password Authentication (SPA): We recommend having this unchecked.
10.Click More Settings.
11.Click Outgoing Server.
12.Check My outgoing server (SMTP) requires authentication.
13.Select Use the same settings as my incoming mail server.
14.Click Advanced.
15.Fill in the following information:
Incoming Server (IMAP Port): 143
Use the following type of encrypted connection (Incoming): Optional. If enabled, change Incoming Server (IMAP Port) to 993.
Outgoing Server (SMTP Port): 587
Use the following type of encrypted connection (Outgoing): Optional. If enabled, change Outgoing Server (SMTP Port) to 465.
16.Click OK.
17.Click Next.
18.Click Finish to complete the set-up.
Email Client Setup: Windows 8 Phone
Stay in touch even when you’re on the go by getting all of your LiveMNC email using your WindowsÆ 8 mobile device. Note that some windows devices refer to their mail app as Metro Mail.
Step by Step Walkthrough (IMAP)
You will need your incoming mail server, outgoing mail server, full email address, and your email password. You can find these settings by logging into your Mail Central.
1.Open Settings.
2.Select Email + Accounts.
3.Select Add an account.
4.Select Advanced setup.
5.Enter the following information:
Email address: Your full mailbox address (example: [email protected])
Password: Your email password
6.Select Next.
7.Select Internet email.
8.Enter the following information:
Account name: Whatever you want (example: IMAP Email)
Your name: The name to display on your email.Incoming email server: imap.LiveMNC
Account type: IMAP4 (Same as IMAP)
User name: Your full mailbox address (example: [email protected])
Password: Your mailbox password
Outgoing (SMTP) email server: smtp.LiveMNC
9.Select Advanced Settings.
10.Enter the following information:
Outgoing Server Requires Authentication: Checked
Use the Same Username and Password for Sending Email: Checked
Require SSL for Incoming Email: Optional
Require SSL for Outgoing Email: Optional
11.Select Sign-in to finish your email set-up.
Step by Step Walkthrough (POP)
You will need your incoming mail server, outgoing mail server, full email address, and your email password. You can find these settings by logging into your Mail Central.
1.Open Settings.
2.Select Email + Accounts.
3.Select Add an account.
4.Select Advanced setup.
5.Enter the following information:
Email address: Your full mailbox address (example: [email protected])
Password: Your mailbox password
6.Select Next.
7.Select Internet email.
8.Enter the following information:
Account name: Whatever you want (example: POP email)
Your name: How you want your name to appear in emails (example: John Smith)
Incoming email server: pop.LiveMNC
Account type: POP3 (Same as POP)
User name: Your full mailbox address (example: [email protected])
Password: Your mailbox password
Outgoing (SMTP) email server: smtp.LiveMNC
9.Select Advanced Settings.
10.Enter the following informatio
Outgoing server requires authentication: Checked
Use the same username and password for sending email: Checked
Require SSL for incoming email: Optional
Require SSL for otgoing email: Optional
11.Select Sign-in to finish your email set-up.
____________________________________________________________________________________________________________
How to configure Outlook settings for Webmail 2022
Setting up a webmail account in Outlook is a not much difficult task but some users will not be having the idea to set up it. So for their convenience, we have mentioned here the entire step by step procedure to configure webmail i.e., POP or IMAP email address in Microsoft Outlook.
By following the steps mentioned below, one can configure webmail in Outlook without facing any difficulties.
Step 1: Open Microsoft Outlook
Step 2: After opening Microsoft Outlook, from the “Tools” menu select “E-mail Accounts”
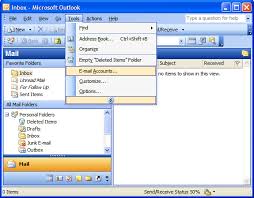
Step 3: On the E-mail Accounts window, select “Add a new e-mail account”, and then click on “Next”.

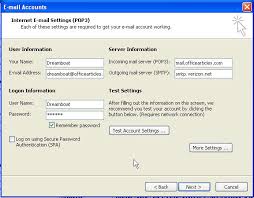
Step 4: Depending on your server type select either “POP3” option or “IMAP” option and click on “Next”

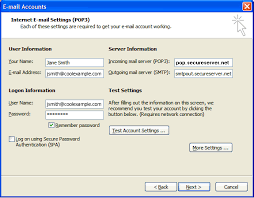
Step 5: On the “POP3 or IMAP” (internet email settings) window that is opened, enter the user information as shown below:
Your Name: Enter you are both first and last name here
E-mail Address: Enter your email address here
User Name: Enter your username here again
Password: Enter here your email account password
Incoming mail server (POP3): POP, Pop.secureserver.net or IMAP, imap.secureserver.net.
Outgoing mail server (SMTP): Smtpout.secureserver.net
Step 6: After entering the whole information click on “More Settings” option available at the bottom of the window as shown below:
Step 7: After clicking on “More Settings” option, there opens a windows as shown below. In the window opened as below click on “Outgoing server” tab.
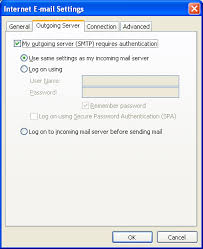
Step 8: Once after clicking on “Outgoing Server” tab, it shows some options as shown above. From those options select “My Outgoing server (SMTP) requires authentication” option.
Step 9: If you do not change the SMTP relay section, select the option i.e., “Use same settings as my incoming mail server”.
If you have changed both username and password in the SMTP relay section of “Manage Email Accounts page”, then in such case select the “Log on using” option.
The image provided above shows that you did not change your SMTP relay section in the “Manage Email Accounts page”.
Step 10: Now click on “Advanced” tab in the “Internet Email settings” window.
Step 11: After the options are displayed, change the “Outgoing server (SMTP)” port value as either 80 or 3535 as shown in the image below and then click on “OK” button.
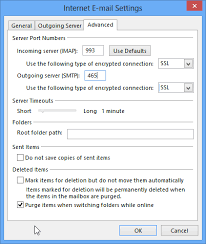
Step 12: Now click on “Next” button
Step 13: After clicking “Next” button, a window will be displayed as shown below:
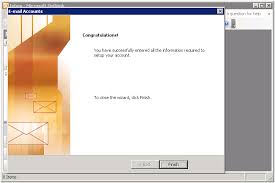
Step 14: Click “Finish” button in the window displayed above.
With the completion of step 15, you have successfully configured webmail account in Microsoft Outlook
please let us know if the issue
still persists and required a call or mail for support. Free- please call or mail at our [email protected]
Domains
What is DNS Propagation
Whenever you make changes to your domain’s name servers, they need to reflect across the internet. This process, which usually takes anywhere between 24-48 hours to complete, is called DNS Propagation.
Why do you have to wait for this long?
All Internet Service Providers (ISPs) across the globe store a copy of your domains DNS whenever your website is resolved through their network. They do this, so that your website loads faster when someone visits it the next time. However, when you change your domains DNS or name servers, this copy or cache is not cleared immediately and has to wait for the ISPís to clear their cache and store a fresh copy of your domains updated DNS information.
Can I speed this up?
There is nothing you can do to accelerate the propagation. However, you can plan for propagation to minimize the downtime affects.
Tip for Minimizing Downtime – Once you have uploaded your web content on the new server, you can add DNS records in your existing DNS zone (most likely on your old server) to redirect all visitors to the new server. This is much faster than waiting for the propagation of new name servers. Once you have the DNS records updated to point to the new server, you can change the name servers anytime.
How do I know when propagation is complete?
Unfortunately there are no tools available to track name server propagation. Even a Who is check, ping, and trace route test cannot indicate whether the propagation is complete. Certain tools similar to Whats My DNS give you some information regarding name server propagation. However, it may not show you accurate and complete information.
When we make any DNS changes, we sit back and relax. The changes gets reflected in a day or two (maximum of 48 hours). Weld suggest you to do the same.
DNS
How to Add MX records through Plesk?
Adding MX records on Plesk panel is super simple and won’t take more than 2 minutes. But before getting there, make sure that your domain is pointing to your hosting package name servers. If you still haven’t done this,click here to get it done. Once you’ve got that out of the way, you can proceed to modify MX records on Plesk:
Login to your Plesk Panel.
Expand the advanced Section.
Click on DNS Settings.
Under Tools. click on Add record.
Select the record type as MX
Keep Mail domain/Host blank.
Enter the MX server / Value for the MX record.
Select the priority.
Click OK.
Incase you get a notification ‘Changes made to DNS are not saved yet’, click on ‘Update’.
How to Delete MX records through Plesk?
Deleting MX records on Plesk panel is super easy and won’t take more than 2 minutes. But before getting there, make sure that your domain is pointing to your hosting name servers. If you still haven’t done this, click here to get it done. Once you’ve got that out of the way, you can proceed to modify MX records on Plesk:
1.Login to your Plesk Panel.
2.Expand the advanced Section.
3.Click on DNS Settings.
4.Tick the box next to the record name for the record type MX.
5.Click on removal.
6.Tick the box to confirm removal of MX record and click OK.
7.In case you get a notification ‘Changes made to DNS are not saved yet’, click on ‘Update.
That’s it. Once you make any changes in the DNS, give it about a couple of hours for DNS propagation to complete so that changes reflect globally.
How to Add MX records on cPanel?
Adding MX records on cPanel is super simple and won’t take more than 2 minutes. But before getting there, make sure that your domain is pointing to your hosting package name servers. If you still haven’t done this, click here to get it done. Once youíve got that out of the way, you can proceed to modify MX records on cPanel. Here’s how you do it:
Login to your cPanel.
Scroll to Mail section.
Click on MX Entry.
Select your domain name from the drop down list.
Do not make any changes in the Email Routing section.
Under the MX Records section, you can view the current MX records.
Under Add New Record section, enter the Priority for the MX record.
Enter the Destination/Value for the MX record.
Click on add New Record.
That’s it. Once you make any changes in the DNS, give it about a couple of hours for DNS propagation to complete so that changes reflect globally.
Deleting TXT record on DNS management
Deleting a TXT record is super easy and wont 2 minutes. Here’s how you do it:
1.Login to your account.
2.You will now see a page with all purchases made by you on our system.
3.Click on the domain name for which you want to edit TXT records.
4.Click on the DNS management option to right of the page.
5.Click on “Manage DNS”.
6.Click on TXT record tab.
7.Click on record name from the table.
7.Click on delete record.
8.Click OK.
That’s it. Once you make any changes in the DNS, give it about a couple of hours for DNS propagation to complete so that changes reflect globally.
Deleting Cname record on DNS management
Deleting a Cname record is super easy and wont more than 2 minutes. Here’s how you do it:
1.Login to your account.
2.You will now see a page with all purchases made by you on our system.
3.Click on the domain name for which you want to edit Cname records.
4.Click on the DNS management option to right of the page.
5.Click on “Manage DNS”.
6.Click on Cname record tab.
7.Click on record name from the table.
8.Click on delete record.
9.Click OK.
That’s it. Once you make any changes in the DNS, give it about a couple of hours for DNS propagation to complete so that changes reflect globally.
Adding a TXT record on DNS Management
Adding a TXT record is super easy and wont take much of your time. Here’s how you do it:
1.Login to your account.
2.You will now see a page with all purchases made by you on our system.
3.Click on the domain name for which you want to edit Cname records.
4.Click on the DNS management option to right of the page.
5.Click on “Manage DNS”.
6.Click on TXT record tab.
7.Click on Add TXT record.
8.Keep Host Name blank.
9.Enter the Value
10.Do NOT edit the TTL value and Add Record
That’s it. Once you make any changes in the DNS, give it about a couple of hours for DNS propagation to complete so that changes reflect globally
Adding a MX record on DNS management
Adding a MX record is super easy and wont take much of your time. Here’s how you do it:
1.Login to your account.
2.You will now see a page with all purchases made by you on our system.
3.Click on the domain name for which you want to edit Cname records.
4.Click on the DNS management option to right of the page.
5.Click on “Manage DNS”.
6.Click on MX record tab.
7.Click on Add MX record.
8.Keep Host Name blank.
9.For Value, select the second radio button and enter the value.
10.Do NOT edit the TTL value.
11.Enter the MX priority and click on Add Record.
That’s it. Once you make any changes in the DNS, give it about a couple of hours for DNS propagation to complete so that changes reflect globally.
Deleting MX record on DNS management
Deleting a MX record is super easy and wonít take much of your time. Here’s how you do it:
1.Login to your account.
2.You will now see a page with all purchases made by you on our system.
3.Click on the domain name for which you want to edit Cname records.
4.Click on the DNS management option to right of the page.
5.Click on “Manage DNS”.
6.Click on MX record tab.
7.Click on record name from the table.
8.Click on delete record.
9.Click OK.
Thatís it. Once you make any changes in the DNS, give it about a couple of hours for DNS propagation to complete so that changes reflect globally.
Adding a Cname record on DNS management
Adding a Cname record is super easy and wonít take much of your time. Hereís how you do it:
1.Login to your account.
2.You will now see a page with all purchases made by you on our system.
3.Click on the domain name for which you want to edit Cname records.
4.Click on the DNS management option to right of the page.
5.Click on “Manage DNS”.
6.Add_cname_DNS-1
7.Click on Cname record tab.
8.Click on Add came record.
9.Enter the Host Name.
10.For Value, select thesecond radio button and enter the value.
11.Do NOT edit the TTL value and click on Add Record.
Thatís it. Once you make any changes in the DNS, give it about a couple of hours for DNS propagation to complete so that changes reflect globally.
Setup default LiveMNC name servers
If you want to use our Email or DNS service, you need to point your domain to LiveMNCís default name servers. Trust us its very easy, so letís do it:
1.Login to your account
2.You will now see a page that lists all purchases made by you on our system
3.Click on the domain name for which you need to set the default name servers
4.Click on the DNS Management option to the right of this page
5.Youíll see a warning message – Your DNS Management service is not configured correctly. Configure Now
6.Click on “Configure Now”
7.Click on “Fix Name Servers Automatically”
Thatís it. All you need to do is just wait for these changes to reflect. It may take about a day or two for this, due to DNS Propagation
Changing your Domain Name Servers
For your website to load, you will need to point it to the correct name servers.
Now, you can either use our name servers or use those of your hosting providers (if you have them). This article will help you in changing the name server to your hosting providers name servers. Lets get started:
1.Login to your account
2.You will now see a page with all purchases made by you on our system
3.Click on the domain name for which you need to change the name servers
4.In the Domain Registration section, click on the option “Name Servers”
5.Replace the existing name servers with the ones provided by your current web host and click on Update Name Servers button
Thatís it. You have just updated your name servers to point to your hosting package. Sit back and relax since It could take anywhere between 24-48 hrs for your website to be functional. This delay happens due to Name Server Propogation.
——————————————————————————————————————————————————————————————————-
Step by Step Walkthrough (POP)
You will need your incoming mail server, outgoing mail server, full email address, and your email password. You can find these settings by logging into your Mail Central.
1.Open Outlook 2003.
2.Click Tools.
3.Click Email Accounts.
4.Select Add a new email.
5.Click Next.
6.Select Account Type: POP3 (same as POP).
7.Click Next.
8.Fill in the following information:
Your Name: The name to display on your email.
Email Address: Your full email address
User Name: Your full email address
Password: Your email password
Incoming mail server (POP3): pop.livemnc.com
Outgoing mail server (SMTP): smtp.livemnc.com
Remember password: We recommend that you keep this checked.
Log on using Secure Password Authentication (SPA): We recommend that you keep this unchecked.
9.Click More Settings.
10.Click Outgoing Server.
11.Check My outgoing server (SMTP) requires authentication.
12.Select Use same settings as my incoming mail server.
13.Click Advanced.
14.Fill in the following information:
Incoming Server (POP3): 110
Outgoing Server (SMTP): 587
15.Click OK.
16.Click Next.
17.Click Finish to complete the set-up.
Step by Step Walkthrough (IMAP)
You will need your incoming mail server, outgoing mail server, full email address, and your email password. You can find these settings by logging into your Mail Central.
1.Open Outlook 2003.
2.Click Tools.
3.Click Email Accounts.
4.Select Add a new email.
5.Click Next.
6.Select Account Type: IMAP
7.Click Next.
8.Fill in the following information:
Your Name: The name to display on your email.
Email Address: Your full email address
User Name: Your full email address
Password: Your email password
Incoming mail server (IMAP): imap.livemnc.com
Outgoing mail server (SMTP): smtp.livemnc.com
Remember password: We recommend that you keep this checked.
Log on using Secure Password Authentication (SPA): We recommend that you keep this unchecked.
9.Click More Settings.
10.Click Outgoing Server.
11.Check My outgoing server (SMTP) requires authentication.
12.Select Use same settings as my incoming mail server.
13.Click Advanced.
14.Fill in the following information
Incoming Server (IMAP): 143
Outgoing Server (SMTP): 587
15. Click OK.
16.Click Next.
17.Click Finish to complete the set-up.
Resetting your WordPress Admin Password from cPanel
Changing your WordPress Admin Password from your WordPress Dashboard is easy, but if you donít have access to the Admin email address and have forgotten the password, then it could be frustrating. But donít worry, weíll help you get access to your account asap.
Before we proceed you’ll need you to access your database. If you have multiple databases and not aware which one you should be accessing, follow these steps quickly:
1.Login to your cPanel.
2.Scroll down to softaculous Apps installer section.
3.Click on WordPress.
4.Under current installations, you will see the details of your wordpress installation.
5.Click on Edit details under options.
6.You will be able to view the database name.
7.Click on Goto Control panel.
8.Scroll down to Databases section.
9.Click on “phpMyAdmin”
10.Youíll now see the phpMyAdmin interface which is the tool to manage your database online
11.Click the “+” sign next to your FTP username.
12.You wíll now see all the databases listed below.
13.Click on your database name to view all the tables within your database.
14.Click on table wp_users.
15.Click on Edit.
16.Under the column, User_pass, select the function as MD5 and enter the Password of your choice under Value.
17.Click Go.
Getting started – Linux Shared hosting
Congratulations on your new hosting package. Weíd guess that youíre eager to start and weíre here to help you do just that:
Updating nameservers
It’s important to link your domain to a hosting server. Click here to update the namesevers of your domain. Please note if your domain is registered with a different domain registrar, then you will need contact your vendor for updating nameservers.
Or Mapping your domain name to your Hosting Package
Now that youíve got your domain and hosting from us, you will need to map your domain name to your hosting package. So letís get started:
1.Login to your account
2.You will now see a page with all purchases made by you on our system
3.Click on the where your hosting plan name is mentioned next to it
4.Click on ìName Server Detailsî under the Hosting package that youíve purchased
5.This will open a pop-up window. Copy the 2 name servers that you see on a notepad
6.Now scroll up to the Domain Registration section. Over here click on ìName Serversî
7.Replace the existing name servers and with the ones you noted earlier and click on Update Name Servers button
Thatís it. Youíve just mapped your domain name to point to your brand new hosting package. It could take anywhere between 24-72 hrs for your website to be functional due to DNS Propagation
Accessing cPanel
Get access to your cPanel interface from the following to load the login page
http://yourdomainname/cpanel (http://IPaddress/cpanel)
http://yourdomainname:2082 (http://IPaddress:2082)
Creating email accounts
Creating Emails on Windows Hosting
Creating your email addresses on Windows Hosting is very simple. It should not take you more than 5 minutes to set it up. Letís get started:
1.Login to your Parallels Plesk Panel
2.Click on the “Mail” tab on the top
3.Click on the button “Create E-mail Address”
4.Fill in the desired Email and Password
5.Set a Mailbox Quota
6.3Click on OK
Thatís it, youíre done!
To check your email, you may use the webmail interface by opening a new tab on your browser and entering the URL – webmail.your-domain.com (eg – If your domain name is abc.com, enter the URL – webmail.abc.com). Once in, you are all set to use your brand new email address.
Related Articles:
Checking your Email on Webmail – Windows Hosting
There are multiple ways to check your email. The best and the easiest way is using the webmail. We’ll show you how:
1.Once you have created your email account, just open a browser, and go to webmail.yourdomain.com
2.You’ll see the login screen now. Enter your complete Email address
3.Enter your Password
4.Click on Log in
That’s it! You’re there on your inbox and can start using your emails right away.
Email Client Configuration
Please select the Email Client on which you want to configure your Email account:
Outlook Express
Microsoft Outlook 2010
Microsoft Outlook 2007
Windows Live Mail
Mozilla Thunderbird
Apple Mail
Other Desktop Email Client
Please select the Mobile Device on which you want to configure your Email account:
Android
iPhone
iPad
BlackBerry
Windows Phone
Other Mobile Devices
Uploading files to your website
Uploading files to cPanel
Uploading files to cPanel is easy and doesnít take much time. Hereís how you can do it :
1.Login to your cPanel.
2.Scroll to Files section, click on ëFile Managerí.
3.Select Web Root(public_html), click on GO.
4.Click on ëUploadí.
5.Click on ëBrowseí to select the file from your computer.
6.Once the upload is complete, click on ëBack to /home/username/public_htmlí.
Thatís it. You have successfully uploaded files on to cPanel to publish your website.
Note: Primary file should be named as index. Extension will depend on the coding such as index.html, index.php etc.
How to access Hidden files on cPanel
All file names that begin with (dot) such as (.htaccess) are treated as hidden files. To make them accessible, you need to follow 4 easy steps and it wonít even take a minute. Hereís what you need to do:
1.Login to your cPanel.
2.Under Files section, click on File manager.
3.You will see a window pop up for directory selection.
4.Tick the box for ìShow hidden files(dotfiles)î.
Thatís it. Your preference has been saved. Go ahead and select the directory that you would like to view and access the hidden file.
What is FTP? And how to use it
FTP simply stands for ëFile Transfer Protocolí. It is an easy way to transfer/upload files, webpages, images on to your hosting server. The best part about FTP is that you are not restricted to only files, you can also upload folders too. Also, there is no limit on the total number of files or folder size that you upload to the server.
Why is it useful for Me?
On Linux/windows hosting panels such as Plesk or cPanel, you have an upload option, however, they have restrictions such only files can be uploaded or files of size upto 1Gb can be uploaded. This makes it tedious if you have many files and folders to be uploaded on to the server.
FTP clients (applications) help overcome these limitations and make file uploads a walk in the park. Hereís a small list of FTP clients that you can make use of:
FileZilla
Cyberduck
WinSCP
BitKinex
CuteFTP Pro
CrossFTP
Webdrive
ClassicFTP
CoreFTP
Restoring a Backup of your website on cPanel
Restoring your website using cPanel is quite simple. But before we proceed, a few prerequisites that you need to take care of:
If you were using cPanel previously and have downloaded the backup from the Backup option, make sure to extract the backup folder and keep public_html folder separate.
All your website files and folders that need to be published are under the public_html folder.
To upload all files and folder together(recommended), compress(zip or tar) the contents inside public_html.(Please note do not compress the folder public_html, only the contents inside it.)
Make sure that no other file or folder is present inside the public_html folder on your cPanel, this could result in a conflict incase of same file names.
Once youíve got the above covered, you can get to restoring your website:
Login to your cPanel.
Scroll to Files section, click on ëFile Managerí.
Select Web Root(public_html), click on GO.
Click on ëUploadí.
Click on ëBrowseí to select the file from your computer.
Once the upload is complete, click on ëBack to /home/username/public_htmlí.
Click on compressed file icon to select the file and click on ëExtractí.
Do not make any changes to the path and click on ëExtract File(s)í.
Click close.
If the Files have been extracted into a folder, open the folder.
Select all files, click on ëMove Fileí.
Under the destination path, keep the following ë/public_html/í and remove the folder name after it.
Thatís it. Youíve successfully uploaded your website files. You could check your website by resolving your domain name on the browser. Incase you want to restore a database.
Setup a CRON job in cPanel
If youíd like to run a script on your website at specified intervals, you can just setup a CRON job and it will run your script automatically at that time. Hereís how you set it up:
1.Login to your cPanel
2.Scroll down to Advanced section
3.Click on “CRON jobs”
4.Set the time interval for which youíd like to run your CRON job
Note: Cron jobs with frequency of less than 15mins will default to 15mins to prevent crons from using up precious server resources
5.Enter the command to eun your script:
For example, to run a PHP script at an interval, set the command as: php /home/username/public_html/cron.php (where cron.php is your PHP file)
If youíd like to see more such examples, Click Here
6.Click on “Add New Cron Job”
That’s it. Just sit back and relac and the cron job will run automatically to run your script at regular intervals.
Setup redirection for your website URL on Linux Hosting
If youíd like to setup a redirection from one of your website URL to another URL, hereís how you do it
1.Login to cPanel
2.Scroll down to the Domains section
3.Click on “Redirects”
4.Select your domain name or sub-domain name from the drop down list for which you want to setup a redirect
5.If youíd like a sub-directory to be redirected, enter the sub-directory name in the text box beside your domain name (For eg – If you like to redirect yourdomain.com/page1 to example.com enter page1 in this text box)
6.Enter the destination URL to which you want to redirect to
7.Set the www redirection type (Only redirect with www | Redirect with or without www | Do Not Redirect www | Wild Card Redirect)
8.Click on Add
Thatís it. Within a few minutes, youíll start seeing your website URL redirected to the other URL you just entered.
Creating an FTP account on Windows Hosting
If youíre planning to have your website developed by a web developer, you wíll need to give him access to your hosting package. This can be done either by giving him the admin FTP details we shared with you when you purchased the package or by creating an additional FTP account for him. Here ís how you create it:
1.Login to your Plesk Panel
2.Click on “FTP Access”
3.Click on “Create Additional FTP Account”
4.Enter a FTP account name
5.Set the Home Directory to the default value “/”
6.Enter a New FTP Password & confirm it
7.Tick on Read permission & Write permission
8.Click on “OK”
Thatís it. You now have an FTP account created specially for your web developer so that he can access it using an FTP client. Just give him your hosting package IP address and FTP username and password you just created for him and heís all good to go.
Creating an FTP account on Linux Hosting
If youíre planning to have your website developed by a web developer, youíll need to give him access to your hosting package. This can be done either by giving him the admin FTP details we shared with you when you purchased the hosting package or by creating an additional FTP account for him. Hereís how you create it:
1.Login to your cPanel
2.In the Files section, Click on “FTP Accounts”
3.Enter a Login username
4.Enter a password and confirm it
5.The Directory field will get auto-populated with the following value:
public_html/
REMOVE your and set it to just “public_html”
Note – If you wish to grant access to your developer only to a particular sub-directory or an Addon Domain (in case of Multi Domain Hosting), youíll need to set the path of that Directory here
6.Click on “Create FTP account”
Thatís it. You now have an FTP account created specially for your web developer so that he can access it using an FTP client. Just give him your hosting package IP address and FTP username and password you just created for him and heís all good to go.
Creating a sub-domain on Windows Hosting – Plesk
Creating a sub-domain on your Windows Hosting is super easy with your Plesk Panel. Hereís how you do it:
1.Login to your Plesk Panel
2.Click on “Add New Subdomain”
3.Enter a sub-domain name that you are looking to create. For example: support.yourdomain.com
4.The Document Root field will auto-populate with the default path where your website will be hosted for this particular sub-domain. You can change this if youíd like to customize the path for your sub-domain website
5.Click on “OK”
Thatís it. You can now upload content to your sub-domain using FTP or Plesk in the path mentioned that was specified in Document Root
Creating a sub-domain on Linux Hosting
Creating a sub-domain on your Linux Hosting is super easy with your cPanel. Hereís how you do it:
1.Login to your cPanel
2.Scroll down to the Domains section
3.Click on “Subdomains”
4.Enter a sub-domain name that you are looking to create. For example: support.yourdomain.com
5.The Document Root field will auto-populate with the default path where your website will be hosted for this particular sub-domain. You can change this if youíd like to customize the path for your sub-domain website
6.Click on “Create”
Thatís it. You can now upload content to your sub-domain using FTP or cPanel in the path mentioned that was specified in Document Root
Change your cPanel or FTP Password
Changing your cPanel or admin FTP password will take you less than a couple of minutes. Hereís how you do that:
1.Login to your account
2.You will now see a page that lists all purchases made by you on our system
3.Click on the domain name associated with your hosting package
4.Click on “Admin Details”
5.Click on “Change Password”
6.Set the New Password
7.Click on “Change Password”
Thatís it! Your cPanel or admin FTP password is now changed and all good to use.
Common Error Messages on FileZilla
This article shows you common error messages that you may face on FileZilla while connecting through FTP and how it can be resolved.
-
- Scenario 1
Error Message :
Response: 421 Sorry, cleartext sessions are not accepted on this server.
Error: Could not connect to server
Resolution :
Please check the following details while connecting via FileZilla :
Protocol: FTP protocol
Encryption: Require FTP over explicit TLS/SSL
LogonType : Normal
-
- Scenario 2
Error Message :
Response: 530 Login authentication failed
Error: Critical error
Error: Could not connect to server
Resolution :
Please check the following details while connecting via FileZilla:
Step 1
Host : IP Address
Port : 21
Protocol: FTP protocol
Encryption: FTP over explicit TLS/SSL
LogonType : Normal
UserName : Correct Username
Password : Correct Password
Step 2
If you are using the primary FTP connection details, please reset the FTP password which will in turn will reset the hosting panel password. You may Click Here to change the primary FTP details then try to connect.
If you are using secondary FTP connection details (FTP Accounts created from the hosting panel), please reset the FTP password from the cPanel/Plesk panel and then try to connect.
Step 3
Launch FileZilla, click Edit and select Settings.
Click on FTP on the left pane and in the middle pane make sure Passive is selected. Click OK and that’s it.
-
- Scenario 3
Error Message :
Response: 331 User savsuq2b1 OK. Password required
Error: Filezilla is running in kiosk mode
Error: Could not connect to server
Resolution :
The ìkiosk modeî means that FileZilla canít save your password, because the ëNormalí and ëAccountí logon type need to save password so FileZilla can proceed it.
Step 1
LogonType : Ask for Password
You will have to enter the password every time you connect to via the FileZilla application to the FTP Server.
Step 2
If you are not comfortable with entering the password in the FileZilla interface every time you may try to connect via FileZilla to the FTP Server, you just need to change some settings. Launch FileZilla, Go to menu Edit ñ Settings ñ Interface, and uncheck (disable) ìDo not save passwordsî option under Behavior setting. After that you should be able to add new sites on FileZilla.
-
- Scenario 4
Error Message :
Response: 331 User savsuq2b1 OK. Password required
Error: Connetion timed out
Error: Could not connect to server
Resolution :
Step 1
Host : Hosting IP Address
Port : 21
Protocol: FTP protocol
Encryption: FTP over explicit TLS/SSL
Step 2
Check for Firewalls or Antivirus installed on his personal workstation. Disabling them for a while to test the same may help to some extent.
Step 3
If you are working from an Office network. If yes please contact your office IT department for the same.
Add On Point : If Filezilla times out its connection when you are transferring files, try disabling the Timeout setting. To do this, click on “Edit” then choose settings. It will bring up a window .Change the Timeout to zero as shown, click OK, and you’re ready.
-
- Scenario 5
Error Message :
Response: 530 User cannot log in, home directory inaccessible.
Error: Critical error
Error: Could not connect to server
Resolution :
Step 1
Check if the home directory of the FTP account created exists or not. The problem can easily be fixed by creating the directory set as home for the FTP user. You can see which directory each FTP user has from your cPanel > FTP Accounts. The directory will be shown in the Path section of the page.
Step 2
Check the credentials of the FTP account created in the hosting panel. Try and reset the password if possible and then try to connect once again.
Step 3
You also need to check the permission of the home folder. It must be 710 and not 755 (in case of Linux Hosting).
-
- Scenario 6
Error Message :
Response: 421 Home directory not available – aborting
Error: Could not connect to server
Resolution :
This means that the FTP user you are trying to log in with is configured to use a home directory which does not exist. The problem can easily be fixed by creating the directory set as home for the FTP user. You can see which directory each FTP user has from your cPanel > FTP Accounts. The directory will
be shown in the Path section of the page.
Reseller Hosting
Creating a hosting plan on Windows Reseller Hosting
Just like we have various plans for our customers on our website, you too can create packages for your customers with the Windows Reseller Hosting. In this article weíll help you create such a plan or package under your Reseller Hosting plan, so letís get started:
1.Login to your Reseller Plesk Panel
2.Click on “Service Plans” in the menu you see to your left
3.Click on “Add New Plan”
4.Set a Service plan name of your choice
5.Fill in the Resources (Disk Space, Bandwidth, No. of email IDs, etc) you want to allocate for the package
6.Click on “OK”
Thatís it. Youíve just created a new plan on your Windows Reseller Hosting for your customers.
Now if youíd like to give this plan to one of your customer, click here
Creating a customer on Reseller Windows Hosting
If youíd like to sell a hosting plan created on your Windows Reseller Hosting package, youíd need to create a customer account subscription. If youíve still not created the hosting plan, click here. Read on if youíve already created your plans
1.Login to your Plesk Reseller Panel
2.Click on “Customers” in the menu you see to your left
3.Click on “Add New Customer”
4.Fill in the information of your customer
5.Set a username and password for your customers to access the panel
6.Enter your customerís domain name
7.Set a FTP username and password for the subscription
8.Choose the service plan that youíve created
9.Click on “OK”
Thatís it. You can pass on these credentials to your customer so that he/she can start using it right away.
Changing the package or plan of a website in your Linux Reseller Hosting
If your customerís hosting plan on your Reseller Linux Hosting is falling short of resources or youíd like to set it limited resources, you can upgrade or downgrade their plan.
If youíve still not created an appropriate plan for that customer, you can create one by referring to the article here
Once youíve created the package, you need to change your customerís hosting plan. You can do it easily. Hereís how you do it:
1.Login to your WHM
Search for the Account Functions section on the navigation to your left
2.Click on “List Accounts” in this section
3.Youíll now see your customers account on this page.
4.Click on the “+” sign to the left of your customerís domain
5.Click on “Change Plan”
6.Select the Plan that youíd like to set for that customer
7.Click on “Upgrade/Downgrade”
Thatís it. Your customer hosting will be updated in just a few seconds.
Adding an Account on WHM – Linux
To create an account on WHM, you first need to Add a Package. Once, you have added a Package, you can associate a cPanel account to it. Hereís how you do it:
1.Login to your WHM Account
2.Search for the Account Functions section on the navigation to your left
3.Click on “Create a New Account” in this section
4.Enter your customers Domain name
5.Give a Username and Password for the account
6.Enter your customerís Email address
7.Choose a Package from the drop-down list (You will see the package you created, in this list)
8.You can let the default values in Settings, Reseller Settings, DNS Settings and Mail Routing Settings as is unless you want to customize these
9.Click Create
You may verify the account by clicking on “List Accounts” in the Account Functions section on the navigation to your left. If you wish to login to the cPanel, just click on the cPanel icon beside the domain name.
Thatís it. You have successfully created an account for your customer on your Reseller Hosting.
Creating a Package on WHM – Linux
With Reseller Hosting, you can create multiple sub-packages which you can then re-sell or use to create multiple websites. All these sub-packages can have their own individual cPanel accounts and login credentials. In this article we will create a package under your Reseller Hosting plan, so letís get started:
1.Login to WHM
2.Search for the Packages section on the navigation to your left
3.Click on “Add a Package” in this section
4.Give a Package Name
5.Fill in the Resources (bandwidth, diskspace, no. of email ids etc) you want to allocate for the package
6.Let the default values in Settings be as is
7.Click Add
Thatís it. You have successfully created a package on your Linux Reseller Hosting. You can follow the same set of steps to create more packages if you need them
Now, you will need to create a cPanel account and assign this package to it. Hereís how you can go about it: Creating your cPanel account
VPS Hosting
Changing your VPS or Dedicated Server root password
Changing your VPS root password will be a cup of tea for you after reading this article.
If you donít have a control panel for your VPS, donít worry. Weíll show you how to change it using SSH. Hereís how you do it:
1.Firstly, access your hosting server using SSH. (Click here if you don’t know how to login using SSH)
2.Once logged in, type in the command – passwd & hit Enter
3.Set a new password and confirm it
And Bang! Your root password is changed. Wasnít that super easy?
If youíve got a cPanel, you need not access your server using SSH. You can do it using WHM. Hereís how you do it:
1. Login to WHM
2.In the Server Configuration section, Click on “Change Root Password”
3.Set a new password and confirm it
4.Click on “Change Password
5.Thatís it. Your root password is changed.
Adding an Account on WHM – Linux
To create an account on WHM, you first need to Add a Package. Once, you have added a Package, you can associate a cPanel account to it. Hereís how you do it:
1.Login to your WHM Account
2.Search for the Account Functions section on the navigation to your left
3.Click on “Create a New Account” in this section
4.Enter your customers Domain name
5.Give a Username and Password for the account
6.Enter your customerís Email address
7.Choose a Package from the drop-down list (You will see the package you created, in this list)
8.You can let the default values in Settings, Reseller Settings, DNS Settings and Mail Routing Settings as is unless you want to customize these
9.Click Create
You may verify the account by clicking on “List Accounts” in the Account Functions section on the navigation to your left. If you wish to login to the cPanel, just click on the cPanel icon beside the domain name.
Thatís it. You have successfully created an account for your customer on your Reseller Hosting.
Creating a Package on WHM – Linux
With Reseller Hosting, you can create multiple sub-packages which you can then re-sell or use to create multiple websites. All these sub-packages can have their own individual cPanel accounts and login credentials. In this article we will create a package under your Reseller Hosting plan, so letís get started:
1.Login to WHM
2.Search for the Packages section on the navigation to your left
3.Click on “Add a Package” in this section
4.Give a Package Name
5.Fill in the Resources (bandwidth, diskspace, no. of email ids etc) you want to allocate for the package
6.Let the default values in Settings be as is
7.Click Add
Thatís it. You have successfully created a package on your Linux Reseller Hosting. You can follow the same set of steps to create more packages if you need them.
Now, you will need to create a cPanel account and assign this package to it. Hereís how you can go about it: Creating your cPanel account
Billing
What is your Money-back Policy?
Settling Invoice using Online Payment options
Adding Funds to your Customer Account
‘Unexpected Error Occured’ message while renewing my order. What…
Enabling Auto Renew Feature
Auto Renew feature
Cancelling inactive Order / Invoice
Settling invoice from Debit account balance
Failure of Transaction or Multiple Transactions recorded at your …
Change your invoice details
Checking your account transactions
Offline Payment Options
Checking Current Balance in your LiveMNC account
Requesting a Refund
My LiveMNC Account
How to regain access to your LiveMNC account?
My LiveMNC Account is hacked, what should I do?
Managing Renewal notices and other Email Notification
Setting your SMS Preference
I forgot my LiveMNC username and password. How do I login
Changing your Username or Registered Email Address
Changing your account details (Name, Company Name, Country)
Checking the Customer ID of your LiveMNC Account
Resetting your LiveMNC Account Password
Changing your LiveMNC Account Password
How do I login to my LiveMNC account
Moving your Product from one LiveMNC account to another
Checking your account PIN
Most Popular : –
Account:
How To Change Your LiveMNC Account Password :
LiveMNC allows you to change your password at any time. You can either change your password once you have logged in, or by creating a password reset email.
1.Log in to your LiveMNC Control Panel.
2.Go to Change Password.
3.Type in a New Password.
4.Confirm your New Password.
5.Click Change Password.
Minimum Password Requirements
Weak Fair Strong Very Secure
6 Total Characters 6 Total Characters 6 Total Characters 8 Total Characters
1 Number 1 Number 2 Numbers 2 Numbers
0 Special Characters 1 Special Character 1 Special Character 2 Special Characters
1 Uppercase Letter 1 Uppercase Letter 1 Uppercase Letter 1 Uppercase Letter
1 Lowercase Letter 1 Lowercase Letter 1 Lowercase Letter 1 Lowercase Letter
Additional Requirements:
When changing your account password, the new password must meet the Strong or Very Secure minimum requirements.
45 maximum total characters allowed.
Must be different than your account username.
When changing your account password, the new password cannot match the last three passwords used on the account.
Your browser must allow cookies on LiveMNC’s website (this is already enabled by default).
FTP:
How to Connect to Your Website
FTP (File Transfer Protocol) is the method used to upload or download files from your website. You will need to use FTP if you plan on uploading or downloading multiple files at the same timee. LiveMNC has prepared this guide to help you understand just how easy it is to use FTP.
How do I connect via FTP?
File Manager: File Manager is built into your LiveMNC Control Panel and is helpful for uploading small groups of files. You can also use File Manager to organize and manage your website files.
FTP Client: FTP clients are the preferred method when using FTP to transfer files. An FTP Client is an application that specializes in optimizing your FTP connection. FTP clients need to be downloaded and installed before use.
This guide covers a popular FTP Client FileZilla. LiveMNC recommends FileZilla because it is fast, free, and easy to use.
How to Connect to FTP Using FileZilla
1.Download and install FileZilla onto your personal computer.
2.Get your FTP settings (these steps use our generic settings).
3.Open FileZilla.
4.Fill out the following information:
Host: ftp.LiveMNC
Username: Your LiveMNC hosting account username
Password: Your LiveMNC hosting account password
Port: 21
5.Click Quickconnect.
6.FileZilla will attempt to connect. It will display Directory Listing Successful once you are connected.
How to Upload Files Using FileZilla
1.Connect to FTP.
2.Use the Local Site area of FileZilla to locate the folder containing the files you want to upload.
3.Use the Remote Site area of FileZilla to locate the folder you want to upload your files into.
4.Note that the contents for each folder are displayed just below the Local Site and Remote Site areas.
5.Click and drag your file from the Local Site side onto the Remote Site side (Note that you can also select multiple files at a time).
6.Upload progress is displayed in the bottom area of FileZilla.
7.Upload is complete once your uploaded files are listed on the Remote Site side.
How to Download Files Using FileZilla
1.Connect to FTP.
2.Use the Remote Site area of FileZilla to locate the folder containing the files you want to download.
3.Use the Local Site area of FileZilla to locate the folder you want to download your files into.
4.Note that the contents for each folder are displayed just below the Remote Site and Local Site areas.
5.Click and drag your file from the Remote Site side onto the Local Site side (Note that you can also select multiple files at a time).
6.Download progress is displayed in the bottom area of FileZilla.
7.Download is complete once your downloaded files are listed on the Local Site side.
What Other FTP Clients Could I Use
CuteFTP
FlashFXP
FTP Voyager
LeapFTP
SmartFTP
WS FTP
Prevent FTP Blacklisting
As a security precaution against malicous attackers, LiveMNC FTP servers will blacklist the IP address of users that have an excessive number of consecutive failed login attempts. This blacklist prevents the user from gaining access into LiveMNC FTP servers, even if the user begins using the correct login credentials.
To avoid the risk of being blacklisted, make sure that you keep your FTP client’s login credentials up to date. Additionally, we recommend that you limit the number of reconnection attempts inside of your FTP client.
To limit the number of reconnection attempts inside of FileZilla:
1.Go to Edit.
2.Click on Settings.
3.In the window that appears, we recommend that you enter the following settings:
Maximum number of retries: 3
Delay between failed login attempts: 300
What are your nameservers
How Do I Update My Domain’s Nameservers?
1.Log in to your LiveMNC Control Panel.
2.Go to Domain Central.
3.Select the domain you want to edit.
4.Click Nameservers.
5.Use the interface provided to modify your nameservers:
Select Use default name servers to use LiveMNC’s nameservers. This option causes your domain to work with your LiveMNC hosting account.
Select Use different name servers to use another company’s nameservers. This option causes your domain to work with another company.
Click Add More if you’re using more than 2 nameservers for the “Use different name servers” option.
6.Click Save once you’re done modifying your nameservers (changes may require 24 to 48 hours to take effect).
How do I configure Outlook?
You will need your incoming mail server, outgoing mail server, full email address, and your email password. You can find these settings by logging into your Mail Central.
1.Open Outlook 2003.
2.Click Tools.
3.Click Email Accounts.
4.Select Add a new email.
5.Click Next.
6.Select Account Type: POP3 (same as POP).
7.Click Next.
8.Fill in the following information:
Your Name: The name to display on your email.
Email Address: Your full email address
User Name: Your full email address
Password: Your email password
Incoming mail server (POP3): pop.LiveMNC
Outgoing mail server (SMTP): smtp.LiveMNC
Remember password: We recommend that you keep this checked.
Log on using Secure Password Authentication (SPA): We recommend that you keep this unchecked.
9.Click More Settings.
10.Click Outgoing Server.
11.Check My outgoing server (SMTP) requires authentication.
12.Select Use same settings as my incoming mail server.
13.Click Advanced.
14.Fill in the following information:
Incoming Server (POP3): 110
Outgoing Server (SMTP): 587
15.Click OK.
16.Click Next.
17.Click Finish to complete the set-up.
Step by Step Walkthrough (IMAP)
You will need your incoming mail server, outgoing mail server, full email address, and your email password. You can find these settings by logging into your Mail Central.
1.Open Outlook 2003.
2.Click Tools.
3.Click Email Accounts.
4.Select Add a new email.
5.Click Next.
6.Select Account Type: IMAP
7.Click Next.
8.Fill in the following information:
Your Name: The name to display on your email.
Email Address: Your full email address
User Name: Your full email address
Password: Your email password
Incoming mail server (IMAP): imap.LiveMNC
Outgoing mail server (SMTP): smtp.LiveMNC
Remember password: We recommend that you keep this checked.
Log on using Secure Password Authentication (SPA): We recommend that you keep this unchecked.
9.Click More Settings.
10.Click Outgoing Server.
11.Check My outgoing server (SMTP) requires authentication.
12.Select Use same settings as my incoming mail server.
13.Click Advanced.
14.Fill in the following information
Incoming Server (IMAP): 143
Outgoing Server (SMTP): 587
15. Click OK.
16.Click Next.
17.Click Finish to complete the set-up.
Email Client Setup: Outlook 2003
Step by Step Walkthrough (POP)
You will need your incoming mail server, outgoing mail server, full email address, and your email password. You can find these settings by logging into your Mail Central.
1.Open Outlook 2003.
2.Click Tools.
3.Click Email Accounts.
4.Select Add a new email.
5.Click Next.
6.Select Account Type: POP3 (same as POP).
7.Click Next.
8.Fill in the following information:
Your Name: The name to display on your email.
Email Address: Your full email address
User Name: Your full email address
Password: Your email password
Incoming mail server (POP3): pop.LiveMNC
Outgoing mail server (SMTP): smtp.LiveMNC
Remember password: We recommend that you keep this checked.
Log on using Secure Password Authentication (SPA): We recommend that you keep this unchecked.
9.Click More Settings.
10.Click Outgoing Server.
11.Check My outgoing server (SMTP) requires authentication.
12.Select Use same settings as my incoming mail server.
13.Click Advanced.
14.Fill in the following information:
Incoming Server (POP3): 110
Outgoing Server (SMTP): 587
15.Click OK.
16.Click Next.
17.Click Finish to complete the set-up.
Step by Step Walkthrough (IMAP)
You will need your incoming mail server, outgoing mail server
full email address, and your email password. You can find these settings by logging into your Mail Central.
1.Open Outlook 2003.
2.Click Tools.
3.Click Email Accounts.
4.Select Add a new email.
5.Click Next.
6.Select Account Type: IMAP
7.Click Next.
8.Fill in the following information:
Your Name: The name to display on your email.
Email Address: Your full email address
User Name: Your full email address
Password: Your email password
Incoming mail server (IMAP): imap.LiveMNC
Outgoing mail server (SMTP): smtp.LiveMNC
Remember password: We recommend that you keep this checked.
Log on using Secure Password Authentication (SPA): We recommend that you keep this unchecked.
9.Click More Settings.
10.Click Outgoing Server.
11.Check My outgoing server (SMTP) requires authentication.
12.Select Use same settings as my incoming mail server.
13.Click Advanced.
14.Fill in the following information:
Incoming Server (IMAP): 143
Outgoing Server (SMTP): 587
15.Click OK.
16.Click Next.
17.Click Finish to complete the set-up
Email Client Setup: Outlook 2007
You will need your incoming mail server, outgoing mail server, full email address, and your email password. You can find these settings by logging into your Mail Central.
1.Open Outlook 2007.
2.Click Tools.
3.Click Account Settings.
4.Click New to create a new email account.
5.Check Manually configure server settings or additional server types.
6.Click Next.
7.Select Internet Email.
8.Click Next.
9.Fill in the following information:
Your Name: How you want your name to appear in emails (example: John Smith)
Email Address: Your full mailbox address (example: [email protected])
Account Type: POP3 (same as POP)
Incoming mail server: pop.LiveMNC
Outgoing mail server (SMTP): smtp.LiveMNC
User Name: Your full mailbox address (example: [email protected])
Password: Your mailbox password
Remember password: We recommend that you keep this checked.
Require logon using Secure Password Authentication (SPA): We recommend that you keep this unchecked.
10.Click More Settings.
11.Click Outgoing Server.
12.Check My outgoing server (SMTP) requires authentication.
13.Click Advanced.
14.Fill in the following information:
Incoming Server (POP3): 110
Outgoing Server (SMTP): 587
15.Click OK.
16.Click Next to complete the setup of your email client
Step by Step Walkthrough (IMAP)
You will need your incoming mail server, outgoing mail server, full email address, and your email password. You can find these settings by logging into your Mail Central.
1.Open Outlook 2007.
2.Click Tools.
3.Click Account Settings.
4.Click New to create a new email account.
5.Check Manually configure server settings or additional server types.
6.Click Next.
7.Select Internet Email.
8.Click Next.
9.Fill in the following information:
Your Name: How you want your name to appear in emails (example: John Smith)
Email Address: Your full mailbox address (example: [email protected])
Account Type: IMAP
Incoming mail server: imap.LiveMNC
Outgoing mail server (SMTP): smtp.LiveMNC
User Name: Your full mailbox address (example: [email protected])
Password: Your mailbox password
Remember password: We recommend that you keep this checked.
Require logon using Secure Password Authentication (SPA): We recommend that you keep this unchecked.
10.Click More Settings.
11.Click Outgoing Server.
12.Check My outgoing server (SMTP) requires authentication.
13.Click Advanced.
14.Fill in the following information:
Incoming Server (IMAP): 143
Outgoing Server (SMTP): 587
15.Click OK.
16.Click Next to complete the setup of your email client
Email Client Setup: Outlook 2010
Step by Step Walkthrough (POP)
You will need your incoming mail server, outgoing mail server, full email address, and your email password. You can find these settings by logging into your Mail Central.
1.Open Outlook 2010.
2.Click File.
3.Select Info.
4.Click Add Account.
5.Select Manually configure server settings or additional server types.
6.Click Next.
7.Select Internet Email.
8.Click Next.
9.Fill in the following information:
Your Name: The name to display on your email
Email Address: Your full email address
Account Type: POP3 (same as POP)
Incoming mail server: pop.LiveMNC
Outgoing mail server (SMTP): smtp.LiveMNC
User Name: Your full email address
Password: Your email password
Remember password: We recommend that you keep this checked.
Require logon using Secure Password Authentication (SPA): We recommend that you keep this unchecked.
10.Click More Settings.
11.Click Outgoing Server.
12.Check My outgoing server (SMTP) requires authentication.
13.Select Use same settings as my incoming mail server.
14.Click Advanced.
15.Fill in the following information:
Incoming Server (POP3): 110
Outgoing Server (SMTP): 587
16.Click OK.
17.Click Next to complete the set-up
Step by Step Walkthrough (IMAP)
You will need your incoming mail server, outgoing mail server, full email address, and your email password. You can find these settings by logging into your Mail Central.
1.Open Outlook 2010.
2.Click File.
3.Select Info.
4.Click Add Account.
5.Select Manually configure server settings or additional server types.
6.Click Next.
7.Select Internet Email.
8.Click Next.
9.Fill in the following information:
Your Name: The name to display on your email
Email Address: Your full email address
Account Type: IMAP
Incoming mail server: imap.LiveMNC
Outgoing mail server (SMTP): smtp.LiveMNC
User Name: Your full email address
Password: Your mailbox password
Remember password: We recommend that you keep this checked.
Require logon using Secure Password Authentication (SPA): We recommend that you keep this unchecked.
10.Click More Settings.
11.Click Outgoing Server.
12.Check My outgoing server (SMTP) requires authentication.
13.Select Use same settings as my incoming mail server.
14.Click Advanced.
15.Fill in the following information:
Incoming Server (IMAP): 143
Outgoing Server (SMTP): 587
16.Click OK.
17.Click Next to complete the setup.
Email Client Setup: Outlook 2013
Step by Step Walkthrough (POP)
You will need your incoming mail server, outgoing mail server, full email address, and your email password. You can find these settings by logging into your Mail Central.
1.Open Outlook 2013.
2.Click File.
3.Click Info.
4.Click Add Account.
5.Choose Manual setup or additional server types.
6.Click Next.
7.Choose POP.
8.Click Next.
9.Fill in the following information:
Your Name: The name to display on your email.
Email Address: Your full email address
Account Type: POP
Incoming Mail Server: pop.LiveMNC
Outgoing Mail Server (SMTP): smtp.LiveMNC
User Name: Your full email address
Password: Your emailpassword
Remember Password: We recommend having this checked.
Require logon using Secure Password Authentication (SPA): We recommend having this unchecked.
10.Click More Settings.
11.Click Outgoing Server.
12.Check My outgoing server (SMTP) requires authentication.
13.Select Use the same settings as my incoming mail server.
14.Click Advanced.
15.Fill in the following information:
Incoming Server (POP Port): 110
Use the following type of encrypted connection (Incoming): Optional. If enabled, change Incoming Server (POP Port) to 995.
Outgoing Server (SMTP Port): 587
Use the following type of encrypted connection (Outgoing): Optional. If enabled, change Outgoing Server (SMTP Port) to 465.
16.Click OK.
17.Click Next.
18.Click Finish to complete the set-up.
Step by Step Walkthrough (IMAP)
You will need your incoming mail server, outgoing mail server, full email address, and your email password. You can find these settings by logging into your Mail Central.
1.Open Outlook 2013.
2.Click File.
3.Click Info.
4.Click Add Account.
5.Choose Manual setup or additional server types.
6.Click Next.
7.Choose IMAP.
8.Click Next.
9.Fill in the following information:
Your Name: The name to display on your email.
Email Address: Your full mailbox address
Account Type: IMAP
Incoming Mail Server: imap.LiveMNC
Outgoing Mail Server (SMTP): smtp.LiveMNC
User Name: Your full email address
Password: Your email password
Remember Password: We recommend having this checked.
Require logon using Secure Password Authentication (SPA): We recommend having this unchecked.
10.Click More Settings.
11.Click Outgoing Server.
12.Check My outgoing server (SMTP) requires authentication.
13.Select Use the same settings as my incoming mail server.
14.Click Advanced.
15.Fill in the following information:
Incoming Server (IMAP Port): 143
Use the following type of encrypted connection (Incoming): Optional. If enabled, change Incoming Server (IMAP Port) to 993.
Outgoing Server (SMTP Port): 587
Use the following type of encrypted connection (Outgoing): Optional. If enabled, change Outgoing Server (SMTP Port) to 465.
16.Click OK.
17.Click Next.
18.Click Finish to complete the set-up.
Email Client Setup: Windows 8 Phone
Stay in touch even when you’re on the go by getting all of your LiveMNC email using your WindowsÆ 8 mobile device. Note that some windows devices refer to their mail app as Metro Mail.
Step by Step Walkthrough (IMAP)
You will need your incoming mail server, outgoing mail server, full email address, and your email password. You can find these settings by logging into your Mail Central.
1.Open Settings.
2.Select Email + Accounts.
3.Select Add an account.
4.Select Advanced setup.
5.Enter the following information:
Email address: Your full mailbox address (example: [email protected])
Password: Your email password
6.Select Next.
7.Select Internet email.
8.Enter the following information:
Account name: Whatever you want (example: IMAP Email)
Your name: The name to display on your email.Incoming email server: imap.LiveMNC
Account type: IMAP4 (Same as IMAP)
User name: Your full mailbox address (example: [email protected])
Password: Your mailbox password
Outgoing (SMTP) email server: smtp.LiveMNC
9.Select Advanced Settings.
10.Enter the following information:
Outgoing Server Requires Authentication: Checked
Use the Same Username and Password for Sending Email: Checked
Require SSL for Incoming Email: Optional
Require SSL for Outgoing Email: Optional
11.Select Sign-in to finish your email set-up.
Step by Step Walkthrough (POP)
You will need your incoming mail server, outgoing mail server, full email address, and your email password. You can find these settings by logging into your Mail Central.
1.Open Settings.
2.Select Email + Accounts.
3.Select Add an account.
4.Select Advanced setup.
5.Enter the following information:
Email address: Your full mailbox address (example: [email protected])
Password: Your mailbox password
6.Select Next.
7.Select Internet email.
8.Enter the following information:
Account name: Whatever you want (example: POP email)
Your name: How you want your name to appear in emails (example: John Smith)
Incoming email server: pop.LiveMNC
Account type: POP3 (Same as POP)
User name: Your full mailbox address (example: [email protected])
Password: Your mailbox password
Outgoing (SMTP) email server: smtp.LiveMNC
9.Select Advanced Settings.
10.Enter the following informatio
Outgoing server requires authentication: Checked
Use the same username and password for sending email: Checked
Require SSL for incoming email: Optional
Require SSL for otgoing email: Optional
11.Select Sign-in to finish your email set-up.
____________________________________________________________________________________________________________
How to configure Outlook settings for Webmail 2022
Setting up a webmail account in Outlook is a not much difficult task but some users will not be having the idea to set up it. So for their convenience, we have mentioned here the entire step by step procedure to configure webmail i.e., POP or IMAP email address in Microsoft Outlook.
By following the steps mentioned below, one can configure webmail in Outlook without facing any difficulties.
Step 1: Open Microsoft Outlook
Step 2: After opening Microsoft Outlook, from the “Tools” menu select “E-mail Accounts”
Step 3: On the E-mail Accounts window, select “Add a new e-mail account”, and then click on “Next”.
Step 4: Depending on your server type select either “POP3” option or “IMAP” option and click on “Next”
Step 5: On the “POP3 or IMAP” (internet email settings) window that is opened, enter the user information as shown below:
Your Name: Enter you are both first and last name here
E-mail Address: Enter your email address here
User Name: Enter your username here again
Password: Enter here your email account password
Incoming mail server (POP3): POP, Pop.secureserver.net or IMAP, imap.secureserver.net.
Outgoing mail server (SMTP): Smtpout.secureserver.net
Step 6: After entering the whole information click on “More Settings” option available at the bottom of the window as shown below:
Step 7: After clicking on “More Settings” option, there opens a windows as shown below. In the window opened as below click on “Outgoing server” tab.
Step 8: Once after clicking on “Outgoing Server” tab, it shows some options as shown above. From those options select “My Outgoing server (SMTP) requires authentication” option.
Step 9: If you do not change the SMTP relay section, select the option i.e., “Use same settings as my incoming mail server”.
If you have changed both username and password in the SMTP relay section of “Manage Email Accounts page”, then in such case select the “Log on using” option.
The image provided above shows that you did not change your SMTP relay section in the “Manage Email Accounts page”.
Step 10: Now click on “Advanced” tab in the “Internet Email settings” window.
Step 11: After the options are displayed, change the “Outgoing server (SMTP)” port value as either 80 or 3535 as shown in the image below and then click on “OK” button.
Step 12: Now click on “Next” button
Step 13: After clicking “Next” button, a window will be displayed as shown below:
Step 14: Click “Finish” button in the window displayed above.
With the completion of step 15, you have successfully configured webmail account in Microsoft Outlook
please let us know if the issue still persists and required a call or mail for support. Free- please call or mail at our [email protected]